Creating Azure Functions using .NET 5
Azure Functions recently released support for .NET 5. Let's take a look at how to upgrade our existing Azure Functions to use it!


Updated Fri 28 May 2021
Azure Functions recently released support for .NET 5. Let's take a look at how to upgrade our existing Azure Functions to use it!
Why is upgrading to .NET 5 more complicated than last time?
You might be wondering "Why can't I just change netcoreapp3.1 to net5.0 and be done?"
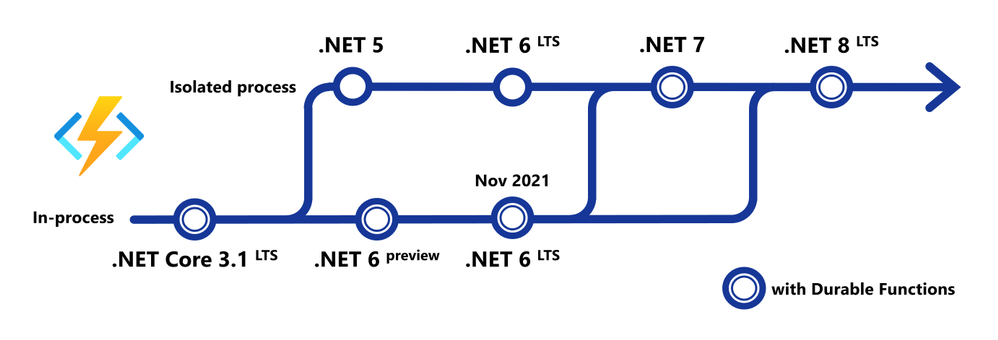
Historically, our Azure Functions' code has always been tightly coupled with the .NET verson of the Azure Functions' Runtime, specifically Long Term Support (LTS) .NET releases. This meant that we couldn't write our code using a newer version of .NET until the Azure Functions team also updated their Azure Functions .NET Runtime.
This is the first release that moves our .NET code to an "Isolated Process model" (aka dotnet-isolated), allowing us to write our Azure Functions' code using any version of .NET!
Walkthrough
In this walkthrough, I'll be providing snippets from the Azure Functions I use for my app GitTrends.
GitTrends is an open-source app available in the iOS and Android App Stores, built in C# using Xamarin, that uses Azure Functions for its backend.
You can find the completed solution in the GitTrends repository, here: https://github.com/brminnick/GitTrends/tree/main/GitTrends.Functions
1. Update .NET
Let's update to .NET 5!
First, download the .NET 5 SDK and install it on your development machine.
Then, in your Functions' CSPROJ, set the following values for TargetFramework, AzureFunctionsVersion, OutputType and _FunctionsSkipCleanOutput:
(Here is a completed working example)
<PropertyGroup>
	<TargetFramework>net5.0</TargetFramework>
	<AzureFunctionsVersion>v3</AzureFunctionsVersion>
	<OutputType>Exe</OutputType>
	<_FunctionsSkipCleanOutput>true</_FunctionsSkipCleanOutput>
</PropertyGroup>
2. Update NuGet Packages
Now let's add the necessary NuGet Packages.
In your Functions' CSPROJ, ensure the following PackageReferences have been added:
Note: ForMicrosoft.Azure.Functions.Worker.Sdk, addOutputItemType="Analyzer"
<ItemGroup>
    <PackageReference Include="Microsoft.Azure.Functions.Worker" Version="1.3.0" />
    <PackageReference Include="Microsoft.Azure.Functions.Worker.Sdk" Version="1.0.3" OutputItemType="Analyzer" />
    <PackageReference Include="Microsoft.Azure.Functions.Worker.Extensions.Http" Version="3.0.13" />
    <PackageReference Include="Microsoft.Azure.Functions.Worker.Extensions.Timer" Version="4.1.0" />
    <PackageReference Include="Microsoft.Azure.WebJobs.Extensions.Storage" Version="4.0.4" />
</ItemGroup>
3. Update local.settings.json
To run our Functions locally, we'll need to tell the Azure Functions Host to use the isolated dotnet runtime in local.settings.json by by setting FUNCTIONS_WORKER_RUNTIME to dotnet-isolated, like so:
(Here is a working completed example)
{
  "IsEncrypted": false,
  "Values": {
    "FUNCTIONS_WORKER_RUNTIME": "dotnet-isolated",
    "AzureWebJobsStorage": "UseDevelopmentStorage=true",
  }
}
Then, in the Functions' CSPROJ, ensure it is being copied to the output directory using CopyToOutputDirectory like so:
(Here is a working completed example)
<ItemGroup>
	<None Update="local.settings.json">
		<CopyToOutputDirectory>PreserveNewest</CopyToOutputDirectory>
	</None>
</ItemGroup>
4. Update Initialization & Dependency Injection
The way we initialize Azure Functions, including Dependency Injection, for .NET 5 has improved.
Old Initialization & Dependency Injection (pre .NET 5.0)
The old way to use Dependency Injection with Azure Functions was to add the [assembly: FunctionsStartup] attribute and inherit from FunctionsStartup.
Here is an example of how we used to initialize Dependency Injection in Azure Functions:
(Here is a completed working example)
//Note: This is the old (pre-.NET 5) way of using Dependency Injection with Azure Functions

[assembly: FunctionsStartup(typeof(Startup))]
namespace GitTrends.Functions
{
    public class Startup : FunctionsStartup
    {
        readonly static string _storageConnectionString = Environment.GetEnvironmentVariable("AzureWebJobsStorage") ?? string.Empty;

        public override void Configure(IFunctionsHostBuilder builder)
        {
            builder.Services.AddHttpClient();();
            builder.Services.AddSingleton<BlobStorageService>();
            builder.Services.AddSingleton<CloudBlobClient>(CloudStorageAccount.Parse(_storageConnectionString).CreateCloudBlobClient());
        }
    }
}

//Note: This is the old (pre-.NET 5) way of using Dependency Injection with Azure Functions
New Initialization & Dependency Injection
The new way is to initialize Azure Functions in .NET 5 is more similar to ASP.NET. It uses to Microsoft.Extensions.Hosting.HostBuilder, like so:
(Here is a competed working example)
namespace GitTrends.Functions
{
    class Program
    {
        readonly static string _storageConnectionString = Environment.GetEnvironmentVariable("AzureWebJobsStorage") ?? string.Empty;

        static Task Main(string[] args)
        {
            var host = new HostBuilder()
                .ConfigureAppConfiguration(configurationBuilder =>
                {
                    configurationBuilder.AddCommandLine(args);
                })
                .ConfigureFunctionsWorkerDefaults()
                .ConfigureServices(services =>
                {
                	// Add Logging
                	services.AddLogging();

                    // Add HttpClient
                    services.AddHttpClient();

                    // Add Custom Services
                    services.AddSingleton<BlobStorageService>();
                    services.AddSingleton<CloudBlobClient>(CloudStorageAccount.Parse(_storageConnectionString).CreateCloudBlobClient());
                })
                .Build();

            return host.RunAsync();
        }
    }
}
5. Update HttpTrigger Functions
To update an existing HttpTrigger Function, we replace the following method parameters:
FunctionName->FunctionHttpRequest->HttpRequestDataIActionResult->HttpResponseDataILogger->FunctionContext
Note:ILoggercan now be found inFunctionContex.GetLogger()
Old HttpTrigger (pre .NET 5.0)
Here is an example of the old (pre .NET 5) way of creating an HttpTrigger:
(Here is a completed working example)
//Note: This is the old (pre-.NET 5) way of creating an HttpTrigger with Azure Functions

public static class GetGitHubClientId
{
	readonly static string _clientId = Environment.GetEnvironmentVariable("GitTrendsClientId") ?? string.Empty;

	[FunctionName(nameof(GetGitHubClientId))]
	public static IActionResult Run([HttpTrigger(AuthorizationLevel.Anonymous, "get")] HttpRequest request, ILogger log)
	{
		log.LogInformation("Retrieving Client Id");

		if (string.IsNullOrWhiteSpace(_clientId))
			return new NotFoundObjectResult("Client ID Not Found");

		return new OkObjectResult(new GetGitHubClientIdDTO(_clientId));
	}
}
//Note: This is the old (pre-.NET 5) way of creating an HttpTrigger with Azure Functions
New HttpTrigger
The new HttpTrigger syntax is nearly identical; only Function is used as the method assembly attribute, and both HttpRequestData and FunctionContext are now being used as its method parameters, and HttpResponseData is used as the return type:
(Here is a completed working example)
public static class GetGitHubClientId
{
	readonly static string _clientId = Environment.GetEnvironmentVariable("GitTrendsClientId") ?? string.Empty;

	[Function(nameof(GetGitHubClientId))]
	public static async Task<HttpResponseData> Run([HttpTrigger(AuthorizationLevel.Anonymous, "get")] HttpRequestData req, FunctionContext context)
	{
		var logger = context.GetLogger(nameof(GetGitHubClientId));
		logger.LogInformation("Retrieving Client Id");

		if (string.IsNullOrWhiteSpace(_clientId))
		{
			var notFoundResponse = req.CreateResponse(System.Net.HttpStatusCode.NotFound);
			await notFoundResponse.WriteStringAsync("Client ID Not Found").ConfigureAwait(false);

			return notFoundResponse;
		}

		var okResponse = req.CreateResponse(System.Net.HttpStatusCode.OK);
        await okResponse.WriteAsJsonAsync(new GetGitHubClientIdDTO(_clientId));

		return okResponse;
	}
}
6. Update TimerTrigger Functions
To update an existing TimerTrigger Function, we must do the following:
FunctionName->Function-
ILogger->FunctionContext
Note:ILoggercan now be found inFunctionContex.GetLogger()
Old TimerTrigger (pre .NET 5.0)
Here is an example of a TimerTrigger Function before updating it to .NET 5.0:
(Here is a working completed example)
//Note: This is the old (pre-.NET 5) way of creating an TimerTrigger with Azure Functions

public class SendSilentPushNotification
{
	const string _runEveryHourCron = "0 0 * * * *";

	readonly static string _notificationHubFullConnectionString = Environment.GetEnvironmentVariable("NotificationHubFullConnectionString") ?? string.Empty;

	readonly static Lazy<NotificationHubClient> _clientHolder = new(NotificationHubClient.CreateClientFromConnectionString(_notificationHubFullConnectionString, GetNotificationHubInformation.NotificationHubName));

	static NotificationHubClient Client => _clientHolder.Value;

	[FunctionName(nameof(SendSilentPushNotification))]
	public static Task Run([TimerTrigger(_runEveryHourCron)] TimerInfo myTimer, ILogger log) => Task.WhenAll(TrySendAppleSilentNotification(Client, log), TrySendFcmSilentNotification(Client, log));
}

//Note: This is the old (pre-.NET 5) way of creating an TimerTrigger with Azure Functions
New TimerTrigger
In the new TimerTrigger, Function is used for its assembly attribute, and, in the its method parameters, we remove ILogger, replacing it with FunctionContext:
(Here is a working completed example)
public class SendSilentPushNotification
{
	const string _runEveryHourCron = "0 0 * * * *";

	readonly static string _notificationHubFullConnectionString = Environment.GetEnvironmentVariable("NotificationHubFullConnectionString") ?? string.Empty;

	readonly static Lazy<NotificationHubClient> _clientHolder = new(NotificationHubClient.CreateClientFromConnectionString(_notificationHubFullConnectionString, GetNotificationHubInformation.NotificationHubName));

	static NotificationHubClient Client => _clientHolder.Value;

	[Function(nameof(SendSilentPushNotification))]
	public static Task Run([TimerTrigger(_runEveryHourCron)] TimerInfo myTimer, FunctionContext context)
	{
		var logger = context.GetLogger(nameof(SendSilentPushNotification));

		return Task.WhenAll(TrySendAppleSilentNotification(Client, logger), TrySendFcmSilentNotification(Client, logger));
	}
}
7. Run .NET 5 Azure Functions Locally
Note: Visual Studio v16.11 is also able to build, debug & run dotnet-isolated functions locally. For simplicity, this walkthrough uses the Azure Functions CLI. 0. Install Azure Functions Core Tools v3.0.3160
- On macOS: Open the Terminal and run the following command:
brew tap azure/functions; brew install azure-functions-core-tools@3 - On Windows: Open the Command Prompt and run the following command:
npm i -g azure-functions-core-tools@3 --unsafe-perm true
- On the command line, navigate to the folder containing your Azure Functions CSPROJ
- On the command line, enter the following command:
func start --verbose
Note: More details on using the Azure Functions CLI can be found here
8. Publish .NET 5 Azure Functions to Azure
Note: Visual Studio v16.11 is also able to deploy dotnet-isolated functions to Azure. For simplicity, this walkthrough uses the Azure Functions CLI. 0. Install Azure Functions Core Tools v3.0.3160
- On macOS: Open the Terminal and run the following command:
brew tap azure/functions; brew install azure-functions-core-tools@3 - On Windows: Open the Command Prompt and run the following command:
npm i -g azure-functions-core-tools@3 --unsafe-perm true
- On the command line, navigate to the folder containing your Azure Functions CSPROJ
- On the command line, enter the following command:
func azure functionapp publish <APP_NAME>
Note: More details on using the Azure Functions CLI can be found here
Conclusion
The Azure Functions team is doing a ton of work to create Isolated Process workers that allow us to use any version of .NET for our Azure Functions' Code.
Going forward, this Isolated Process model will be the recommended way to write code for Azure Functions, and you can read more about it here: https://techcommunity.microsoft.com/t5/apps-on-azure/net-on-azure-functions-roadmap/ba-p/2197916.