> ## Content Index
> Fetch the complete content index at: https://codetraveler.io/llms.txt
> Use this file to discover other available public pages before exploring further.
# Xamarin: Creating a Dark Mode Splash Screen
- URL: https://codetraveler.io/2019/10/11/creating-a-dark-mode-splash-screen/
- Published: 2019-10-11T23:18:14.000Z
- Updated: 2019-10-21T14:08:29.000Z
- Description: Now that iOS 13 and Android Q support Dark Mode, we'll want our app's Splash Screen to be dark too. Let's explore how to create a Splash Screen that is dark when Dark Mode is enabled, but still light when Dark Mode is disabled!
- Author: Brandon Minnick
- Tags: Xamarin.Forms, Xamarin, Xamarin.Android, Xamarin.iOS, Dark Mode, Dark Theme, Dark Appearance, Splash Screen, iOS, Android
Now that [iOS 13](https://docs.microsoft.com/xamarin/ios/platform/ios13/dark-mode?ref=codetraveler.io) and Android Q support Dark Mode, we'll want our app's Splash Screen to be dark too. Let's explore how to create a Splash Screen that is dark when Dark Mode is enabled, but still light when Dark Mode is disabled!
Because splash screens appear before the app has initialized, we cannot write any code to determine whether or not the user has enabled Dark Mode. Luckily, both iOS and Android have built-in tools we'll leverage.
For our Splash Screen, we will leverage iOS's **Asset Catalogue** and Android's **Resources** \> **values-night** to auto-import our light/dark image assets.
I recently implemented this functionality for my app, [Punday](http://mondaypunday.com/app?ref=codetraveler.io), on [iOS](https://appsto.re/us/uYHSab.i?ref=codetraveler.io) and [Android](https://play.google.com/store/apps/details?id=com.minnick.mondaypundayapp&ref=codetraveler.io). Since Punday is not open-source, I put together this walkthrough and a completed sample demonstrating Punday's splash screen.
You can find the completed solution here: [https://github.com/brminnick/DarkModeSplashScreen](https://github.com/brminnick/DarkModeSplashScreen?ref=codetraveler.io)
## iOS Splash Screen
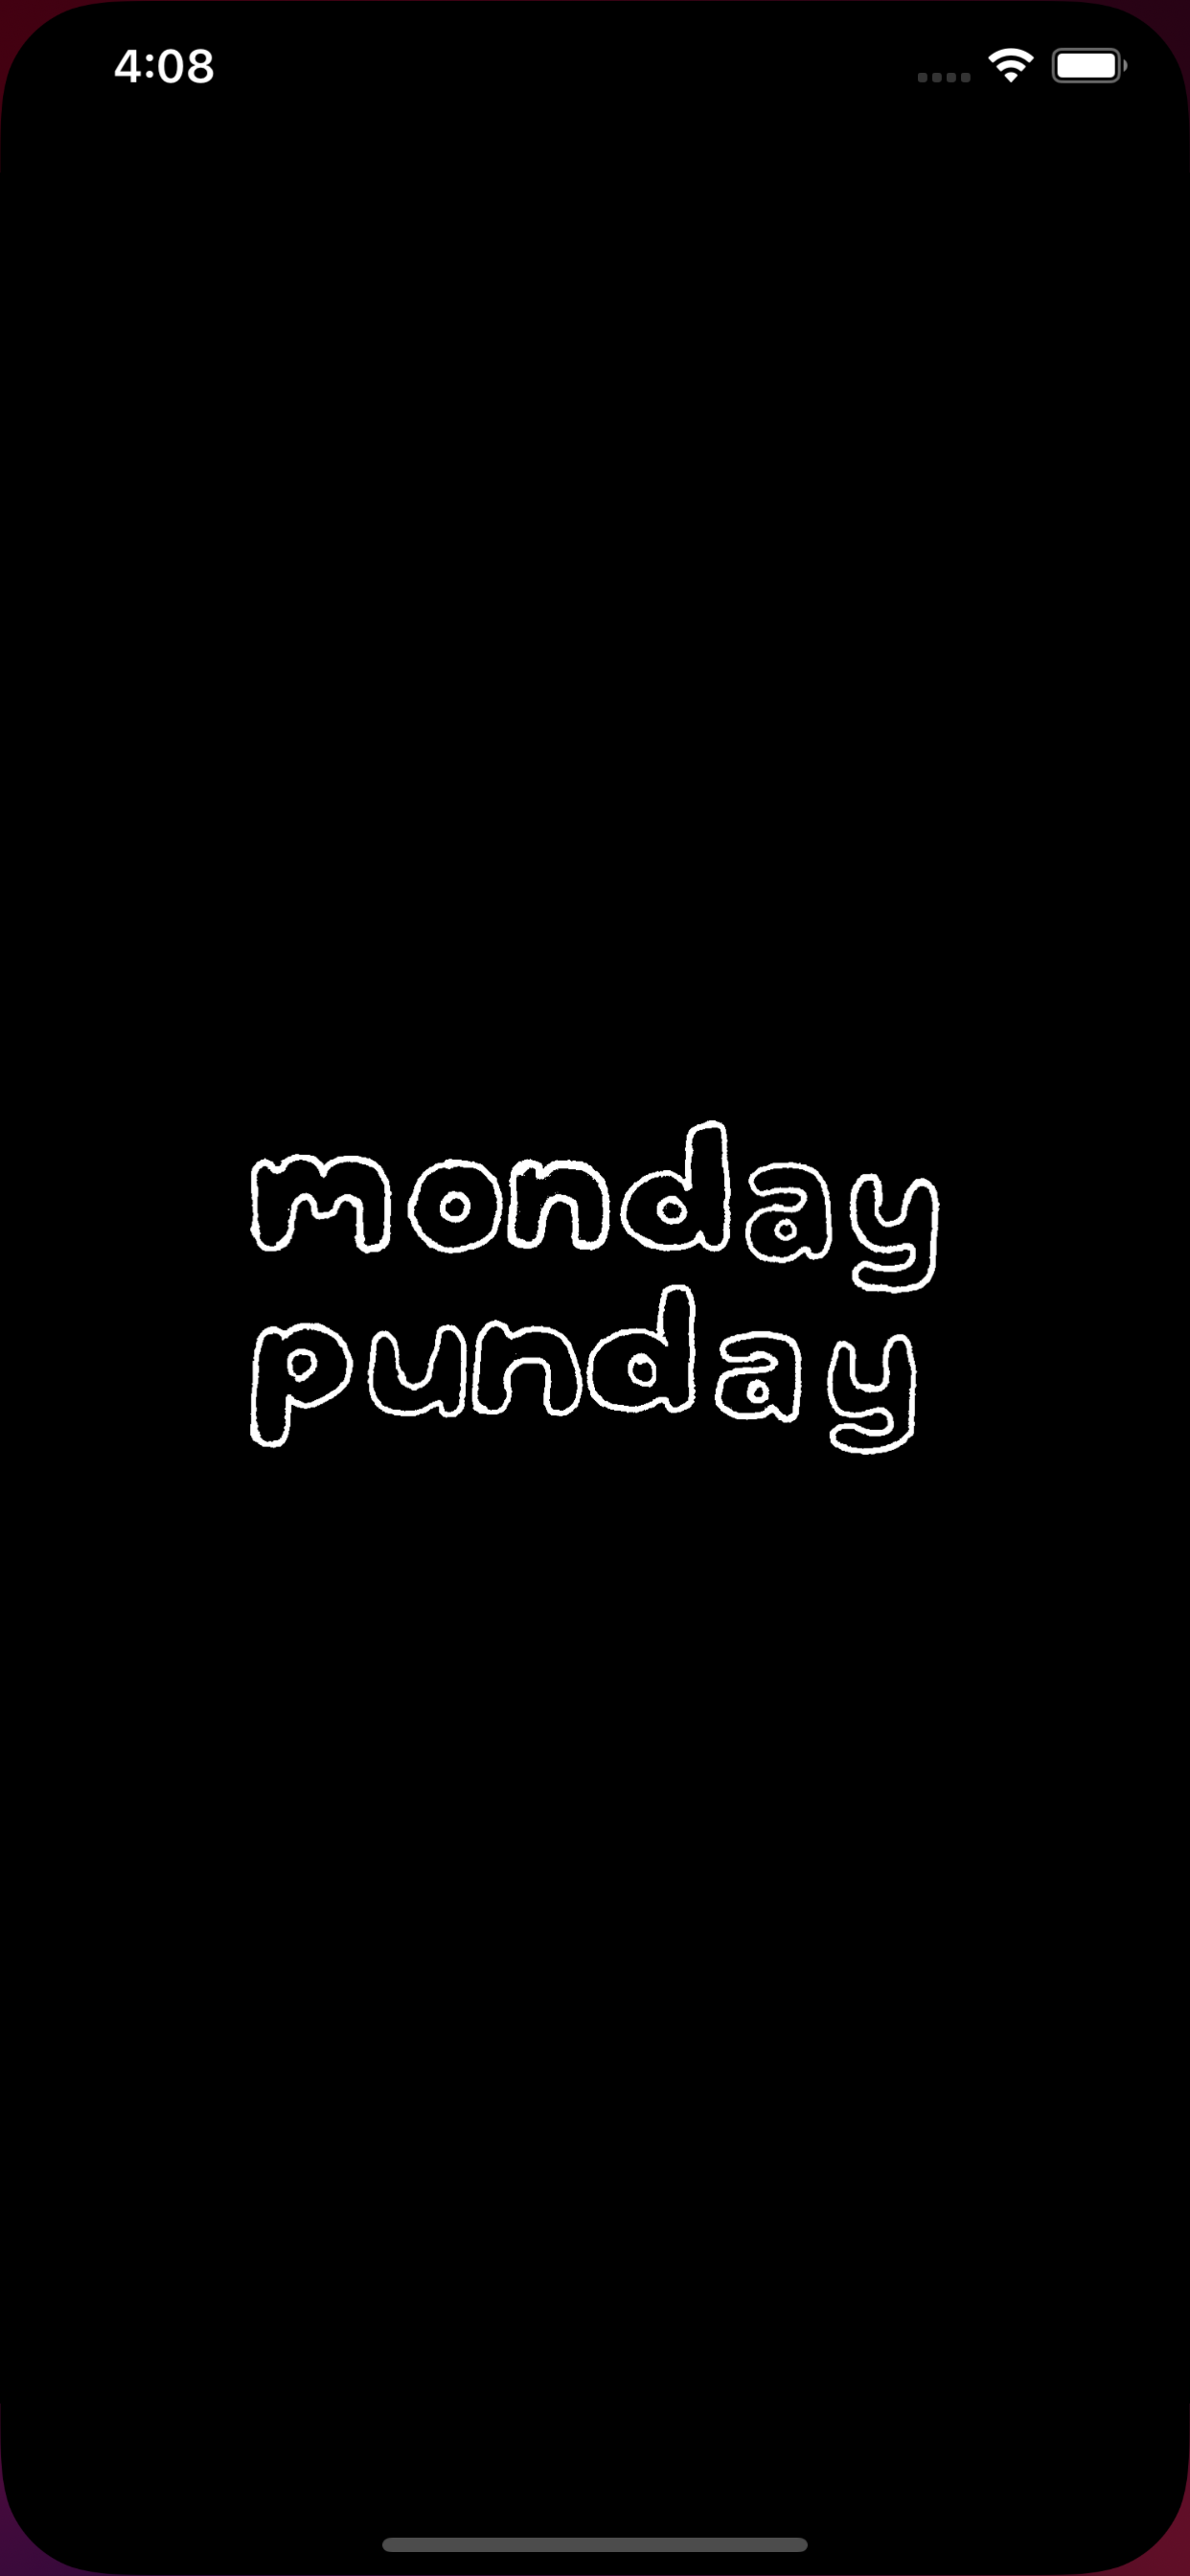
We'll create our iOS Splash Screen using Storyboards that displays an image on a blank background. To support Dark Mode, we'll add 2 versions of our image into our Asset Catalog, one for dark mode and one for light mode.
| Dark Appearance Enabled | Dark Appearance Disabled |
| --------------------------------------------------------------------------------------------------------------------------------------------------- | ---------------------------------------------------------------------------------------------------------------------------------------------------- |
|  |  |
### 1\. Create SplashScreen.storyboard
First, let's create a storyboard that we will use for our iOS splash screen. In our example, our storyboard will contain just a single image.
1. In the **Visual Studio Solution Explorer**, right-click on the Xamarin.iOS project
2. In the right-click menu, select **Add** \> **New File**
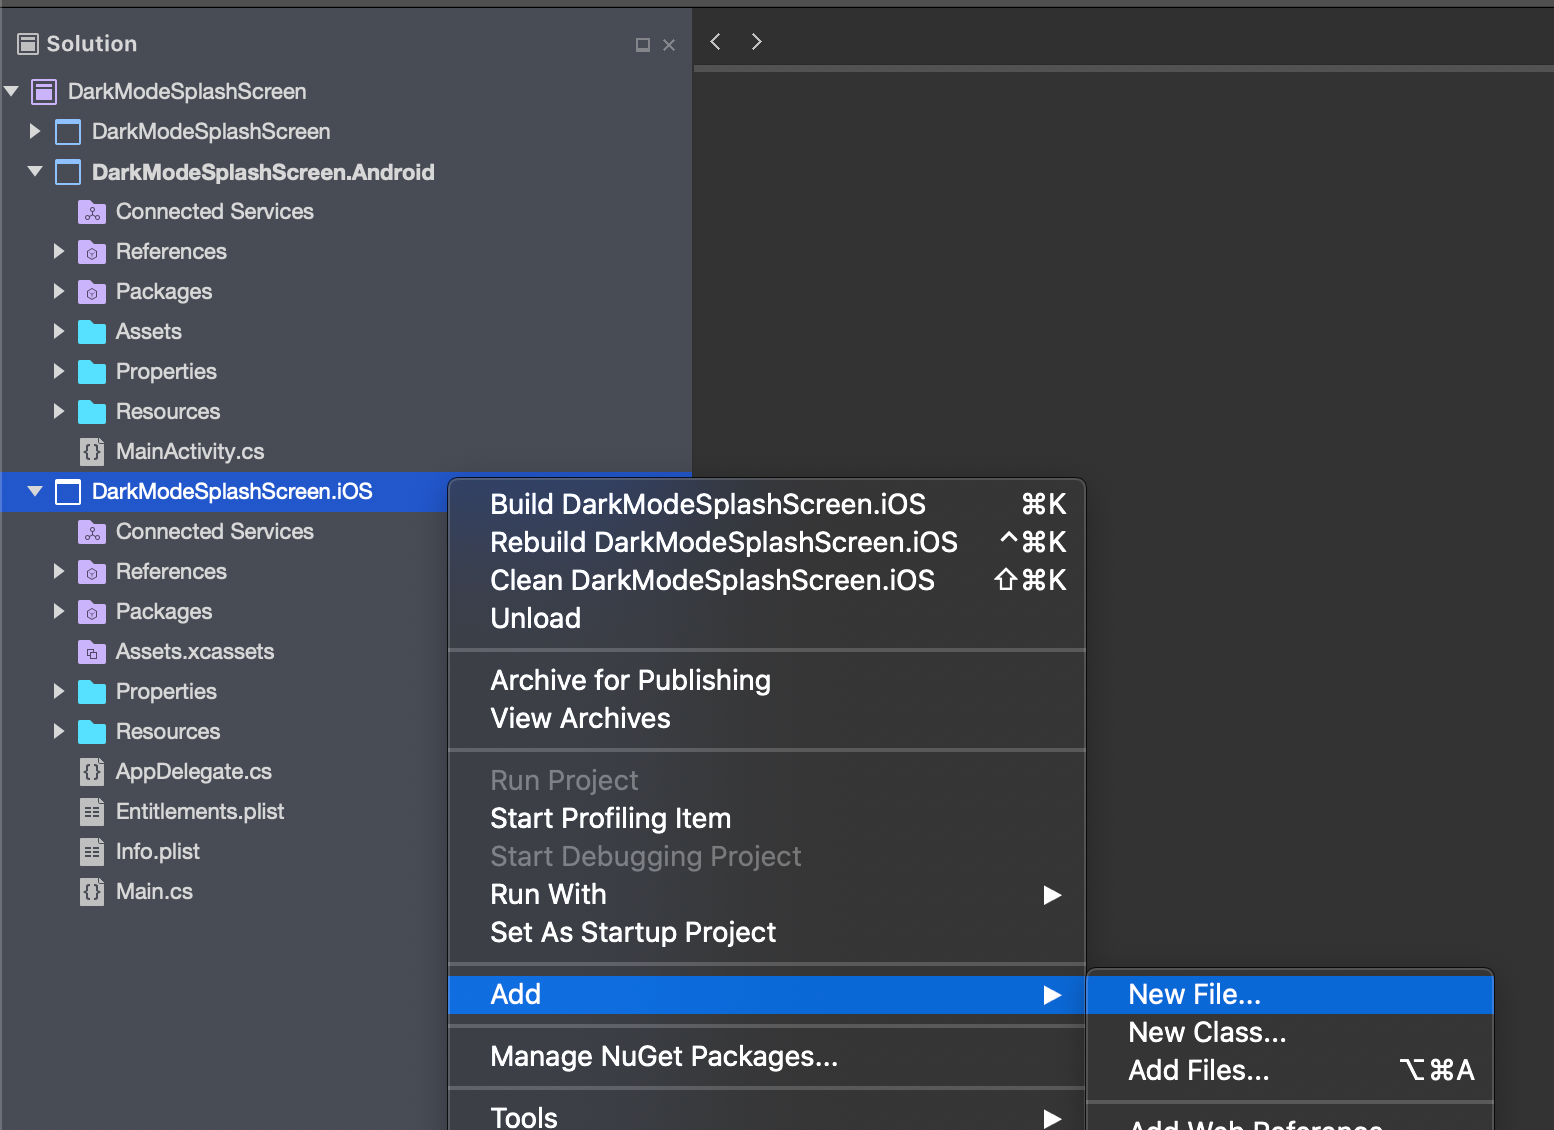
Xamarin.iOS: Add New File
3\. In the **New File** window, select **iOS** \> **Storyboard**
4\. In the **New File** window, name the new file **SplashScreen**
5\. In the **New File** window, select **New**
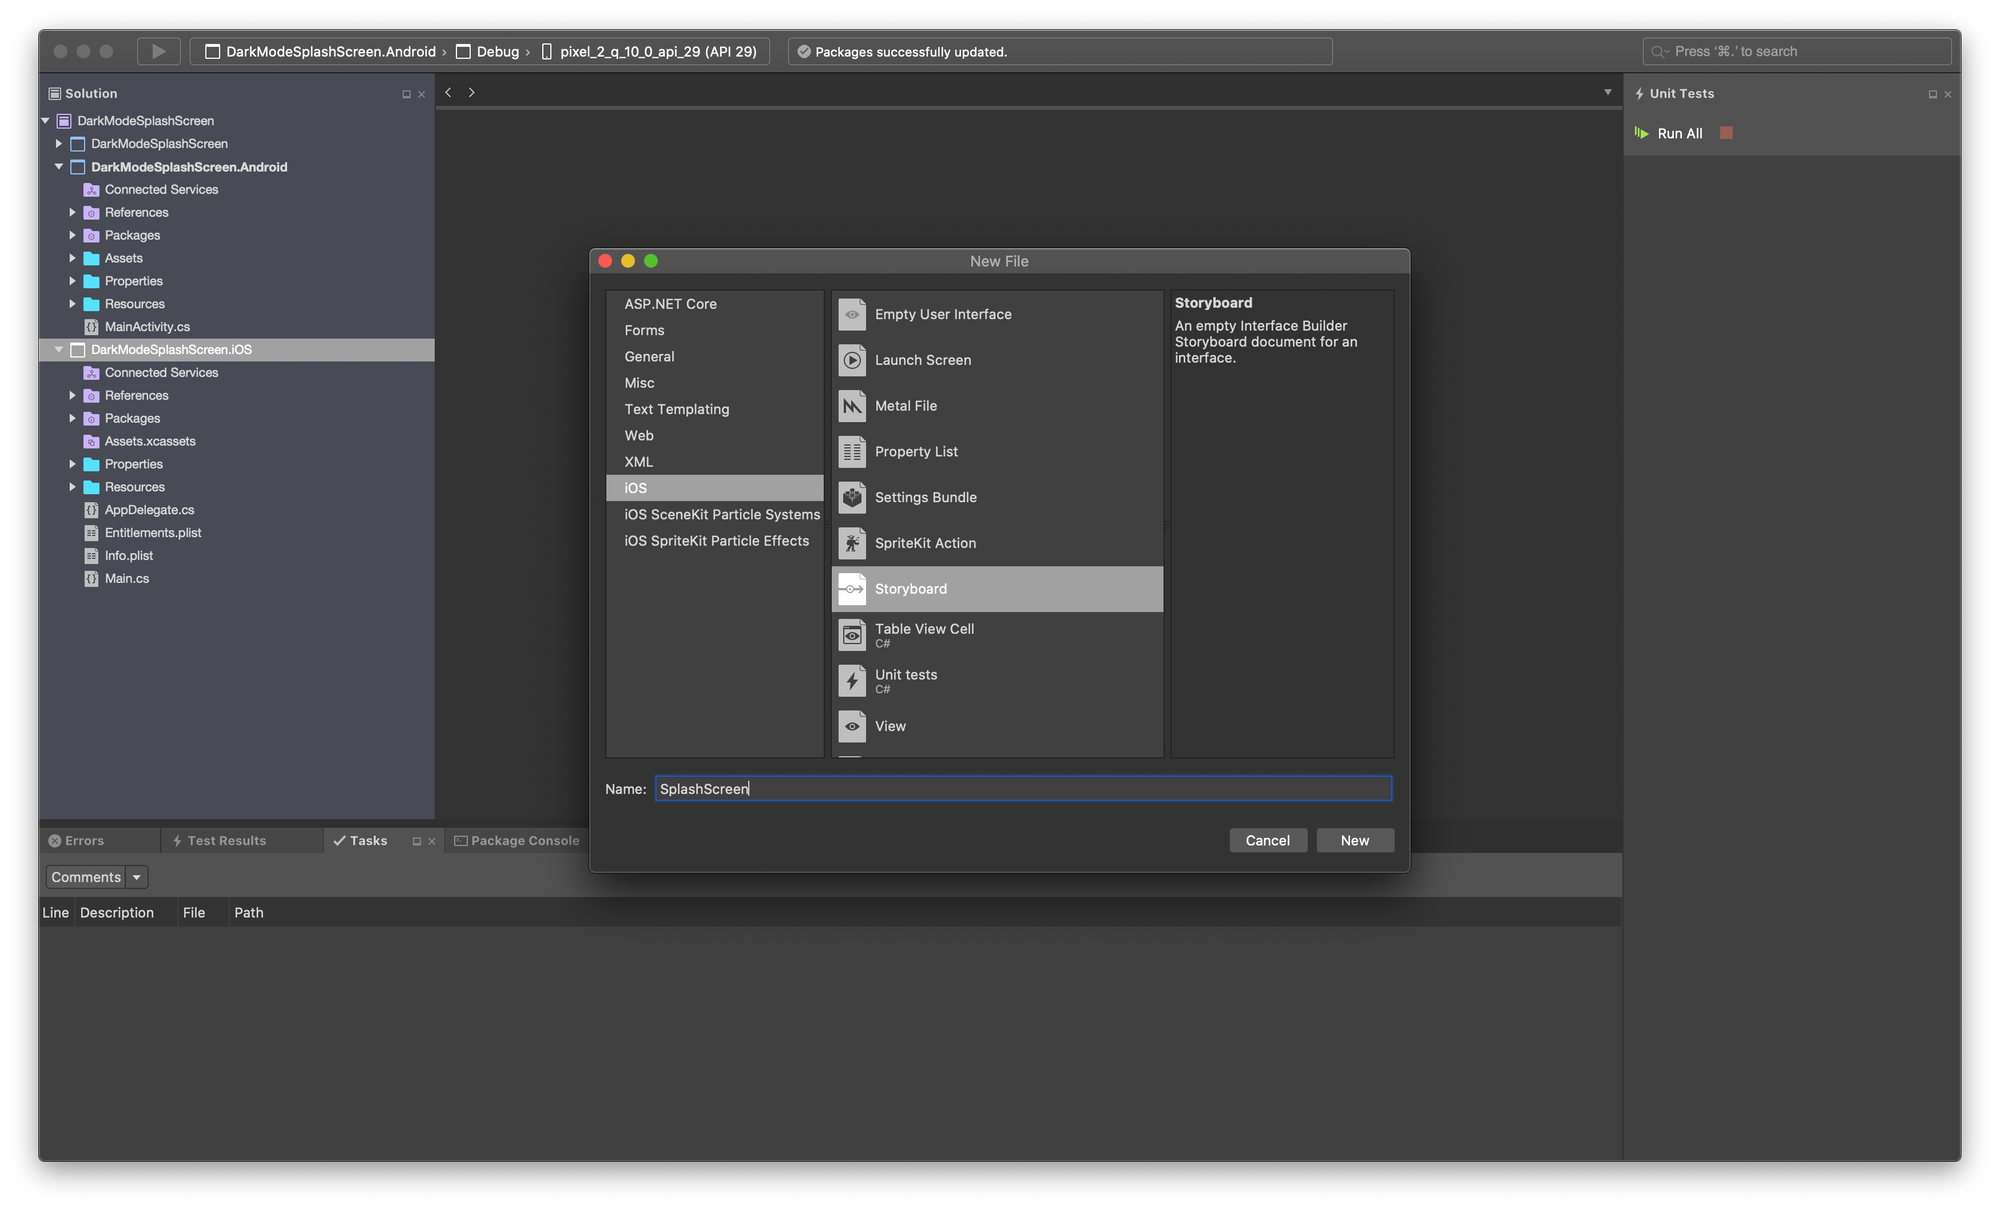
Create SplashScreen.storyboard
6\. In the **Solution Explorer**, open **SplashScreen.storyboard**
7\. In the **SplashScreen.storyboard Editor**, onto the storyboard canvas, drag-and-drop a new **View Controller**
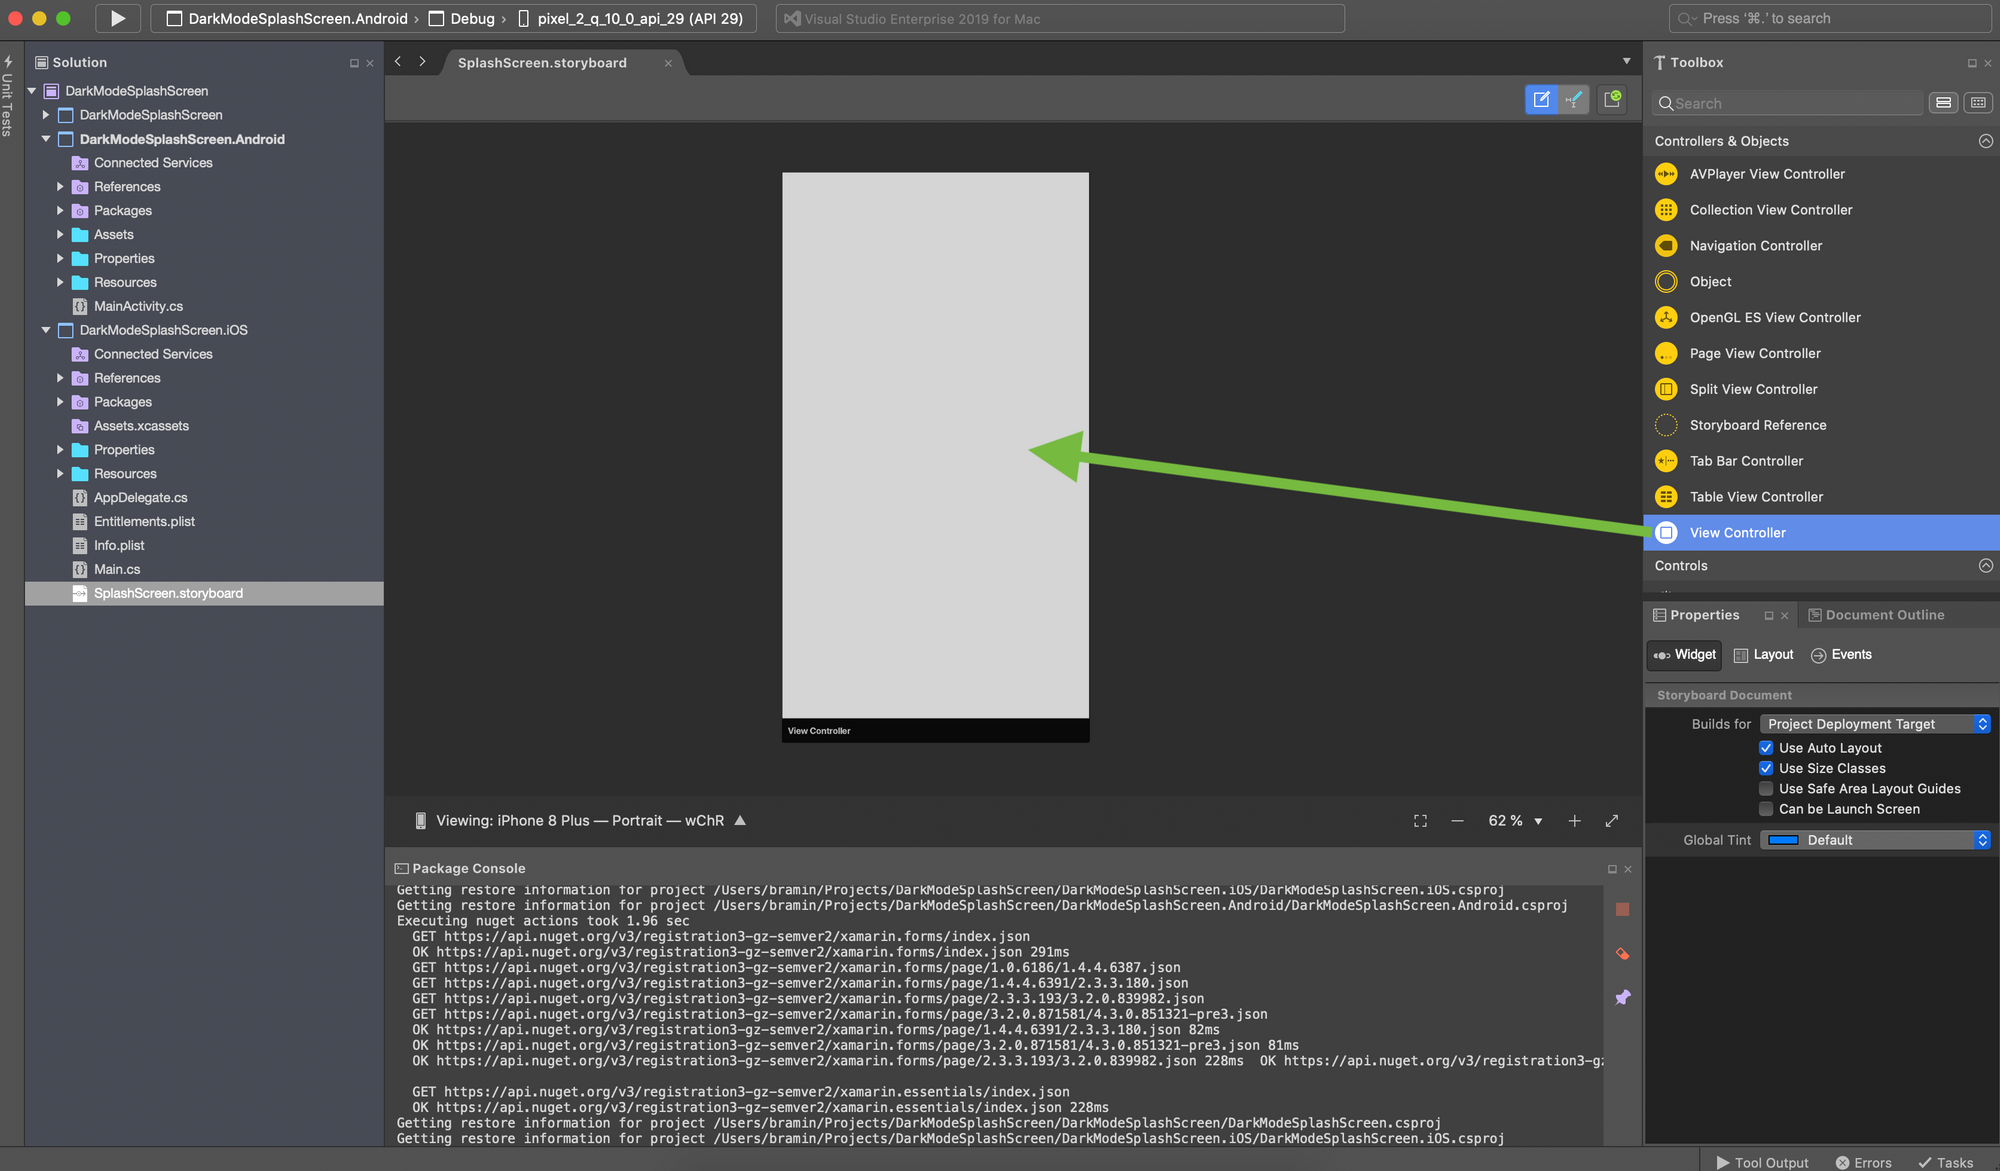
Add New UIViewController
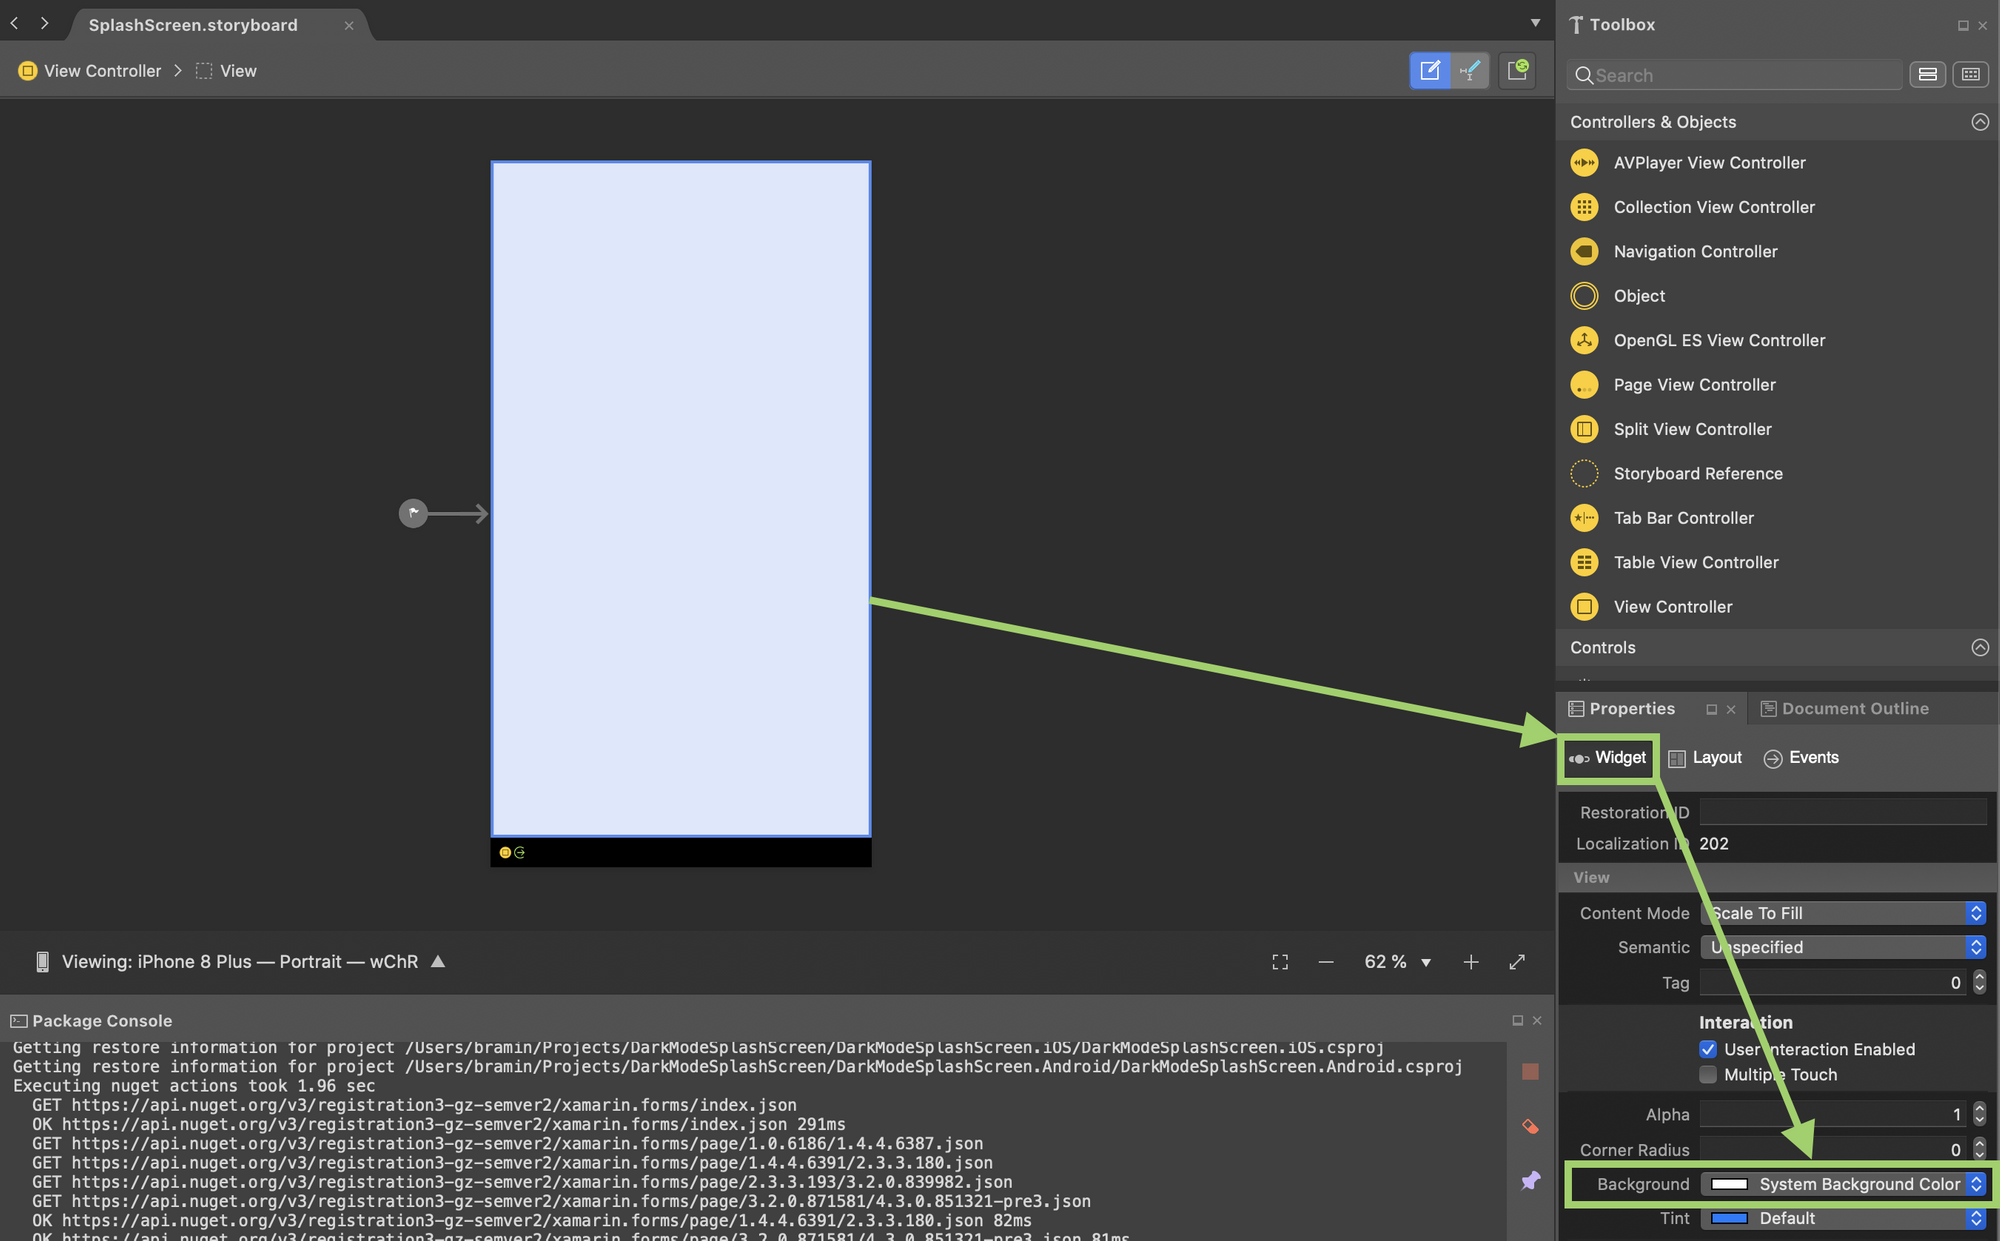
8\. In the **SplashScreen.storyboard Editor**, click on the View Controller to select it
9\. In the **Properties** window, select **Widget**
10\. In the **Widget** pane, set the **Background** to **System Background Color**
> Note: **System Background Color** will be white when the user has not enabled Dark Theme in iOS System Settings, and it will be black when the user has enabled Dark Theme
8\. In the **SplashScreen.storyboard Editor**, onto the View Controller canvas, drag-and-drop a new Image
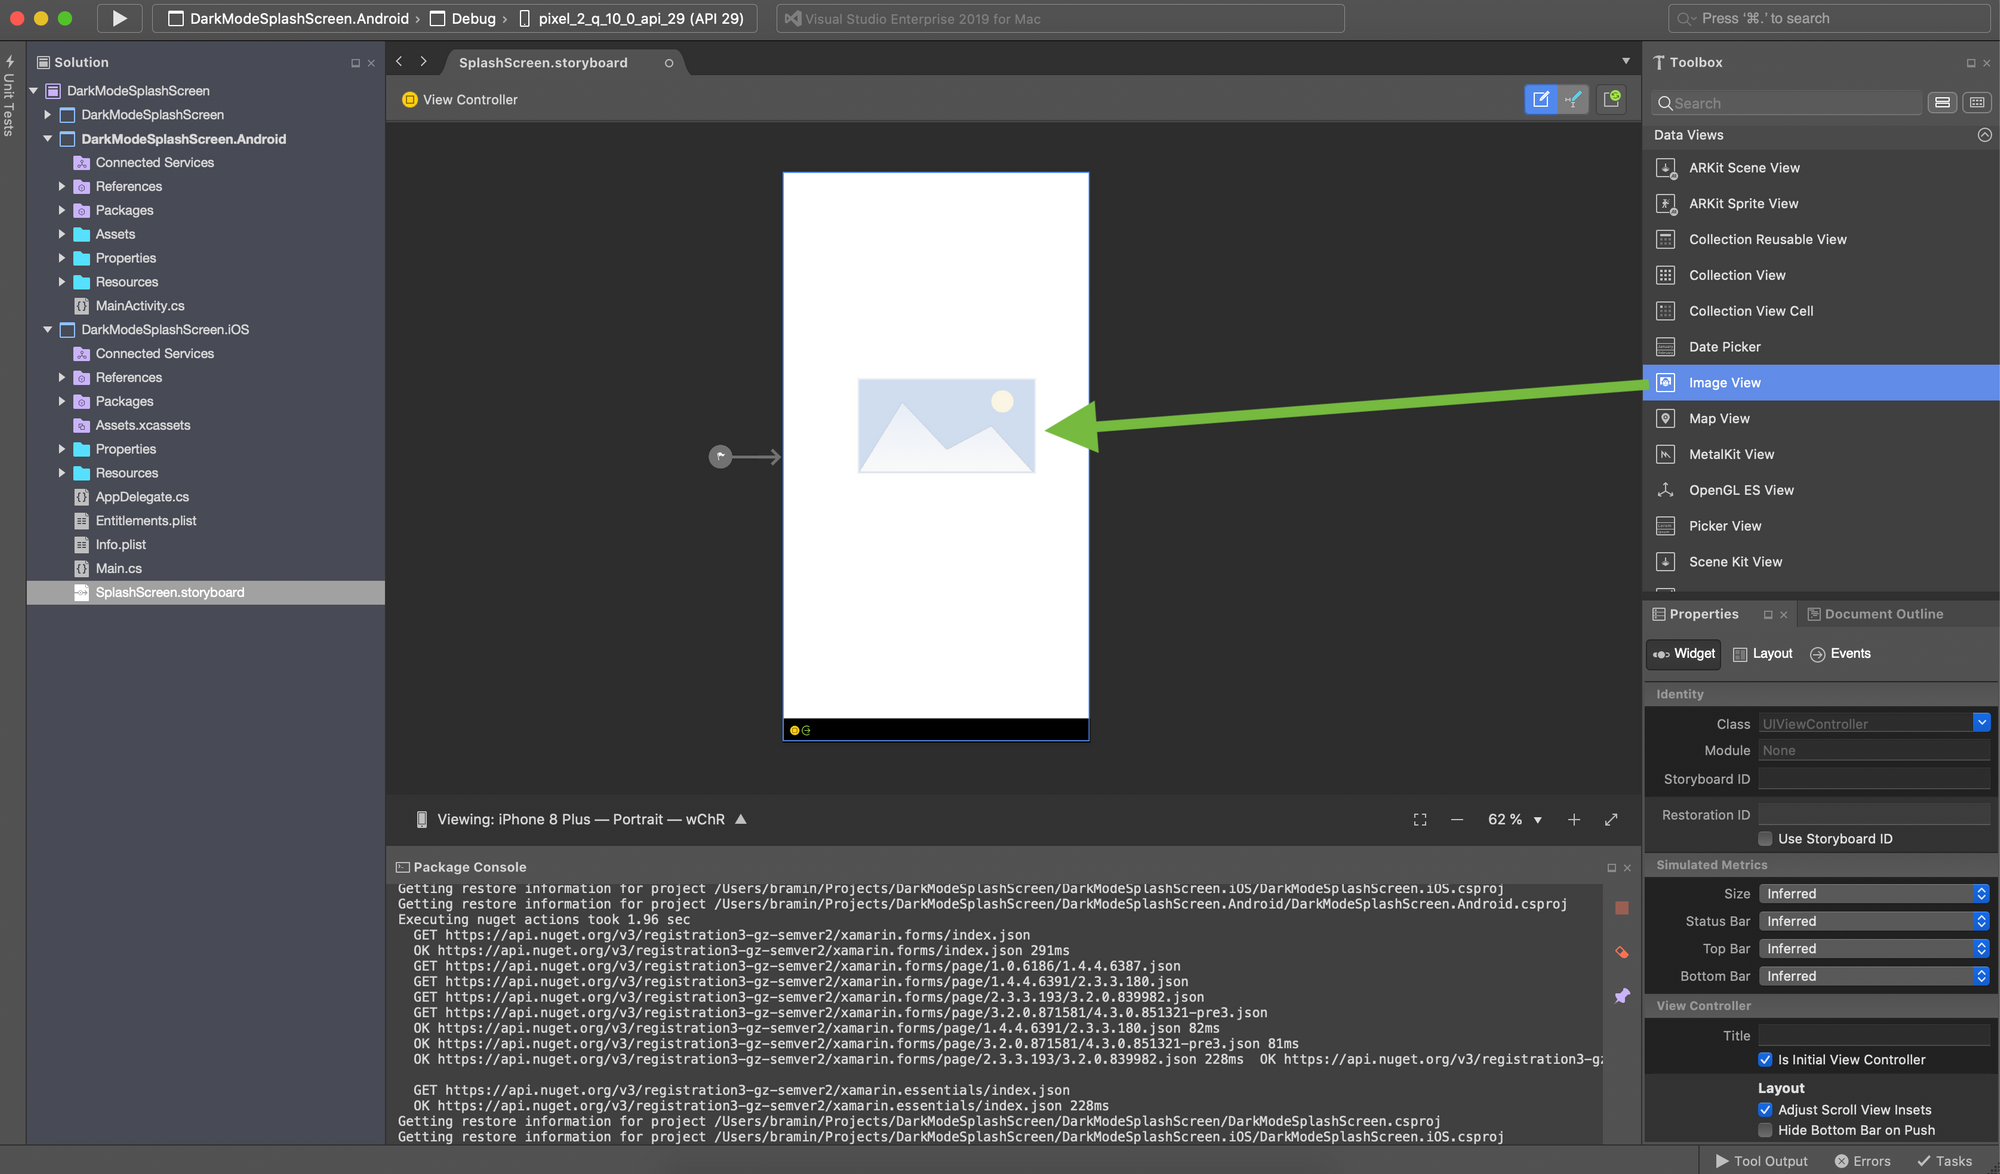
Add UIImageView
9\. In the **SplashScreen.storyboard Editor**, on the View Controller canvas, drag the Image until the it is aligned to the center of the View Controller
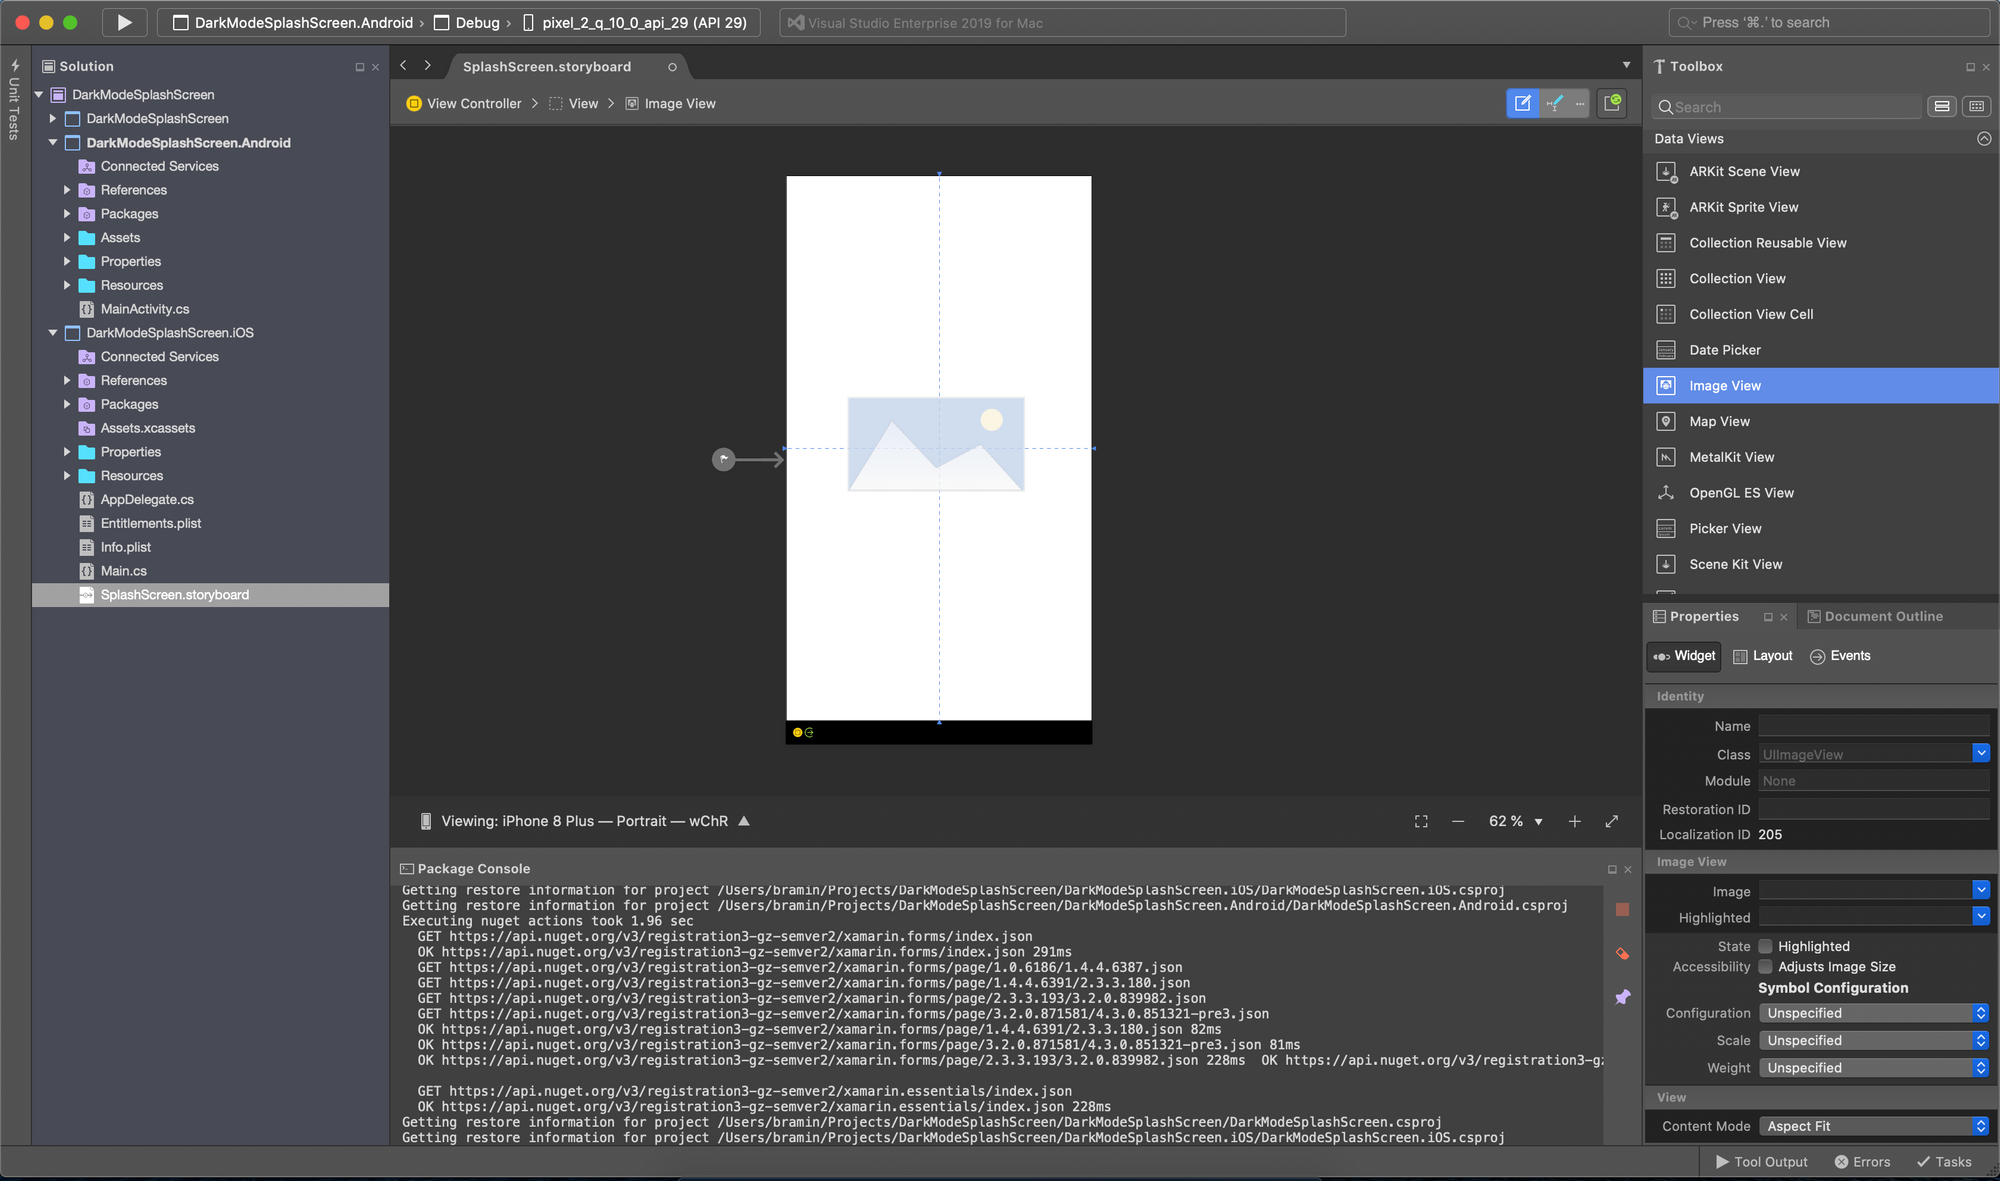
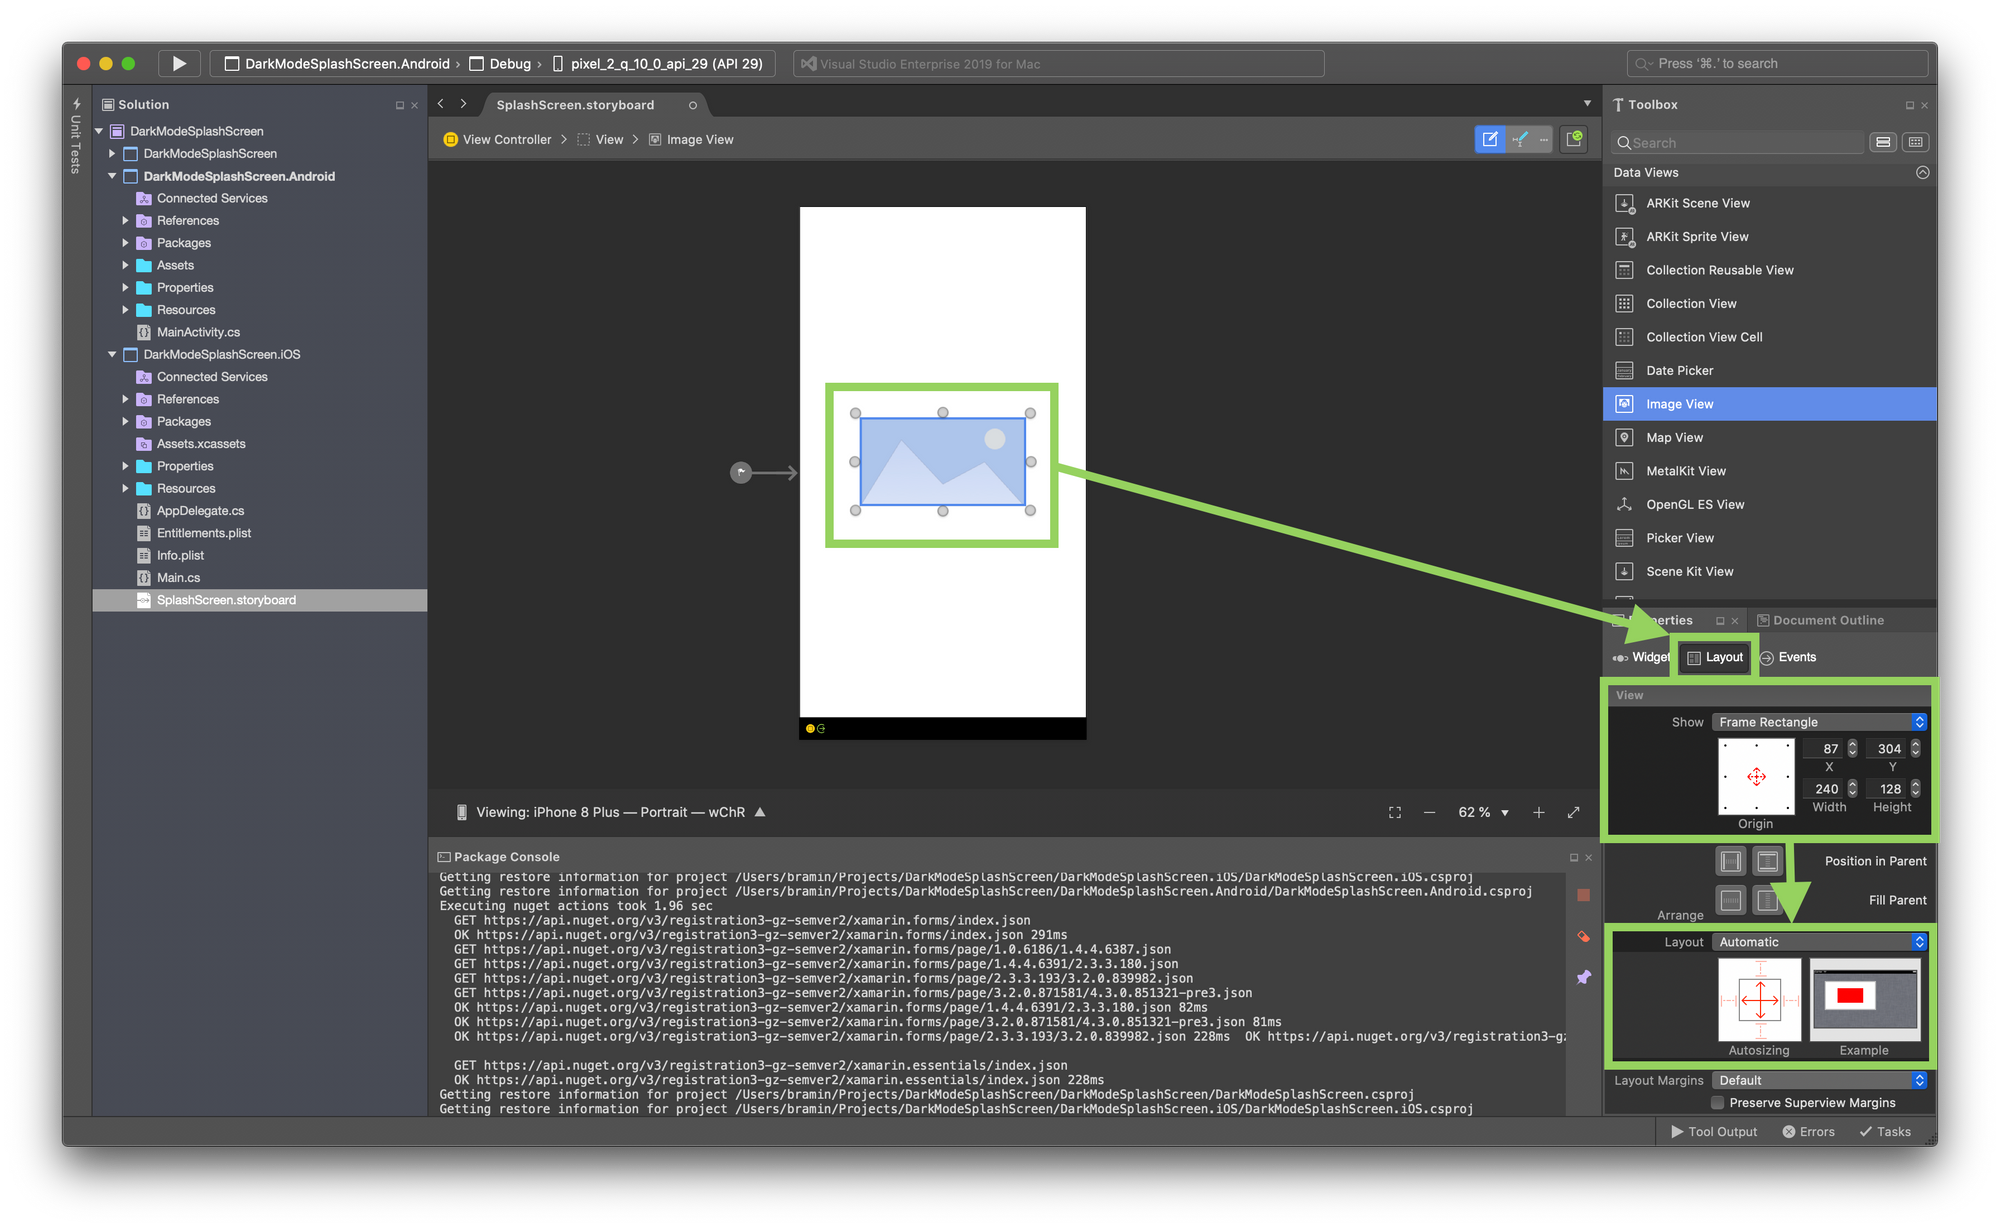
10\. In the **SplashScreen.storyboard Editor**, on the View Controller canvas, click on the Image to select it
11\. In the **Properties** window, select **Layout**
12\. In the **Layout** pane, select **Show** \> **Frame Rectangle**
12\. In the **Layout** pane, in the **Origin 3x3 Grid**, click on the center dot
> *Note: This ensures that our Image will remain centered, regardless of the screen size of the device*
13\. In the **Layout** pane, select **Layout** \> **Automatic**
14\. In the **Layout** pane, in the **Autosizing** window, ensure only the Up/Down Arrow and the Left/Right Arrow is selected
> *Note: This ensures that our Image size will scale up and down, regardless of the screen size of the device*
### 2\. Create New Image Asset
Next, let's create a new Image Asset that has a Dark Mode version and a Light Mode version using `Assets.xcassets`.
1\. (macOS) In the **Visual Studio Solution Explorer**, in the Xamarin.iOS Project, open **Assets.xcassets**
- (PC) In the **Visual Studio Solution Explorer**, in the Xamarin.iOS Project, open **Asset Catalogs** \> **Assets**
2\. In the **Assets.xcassets** window, select **Add** (box with green **+**) > **New Image Set**
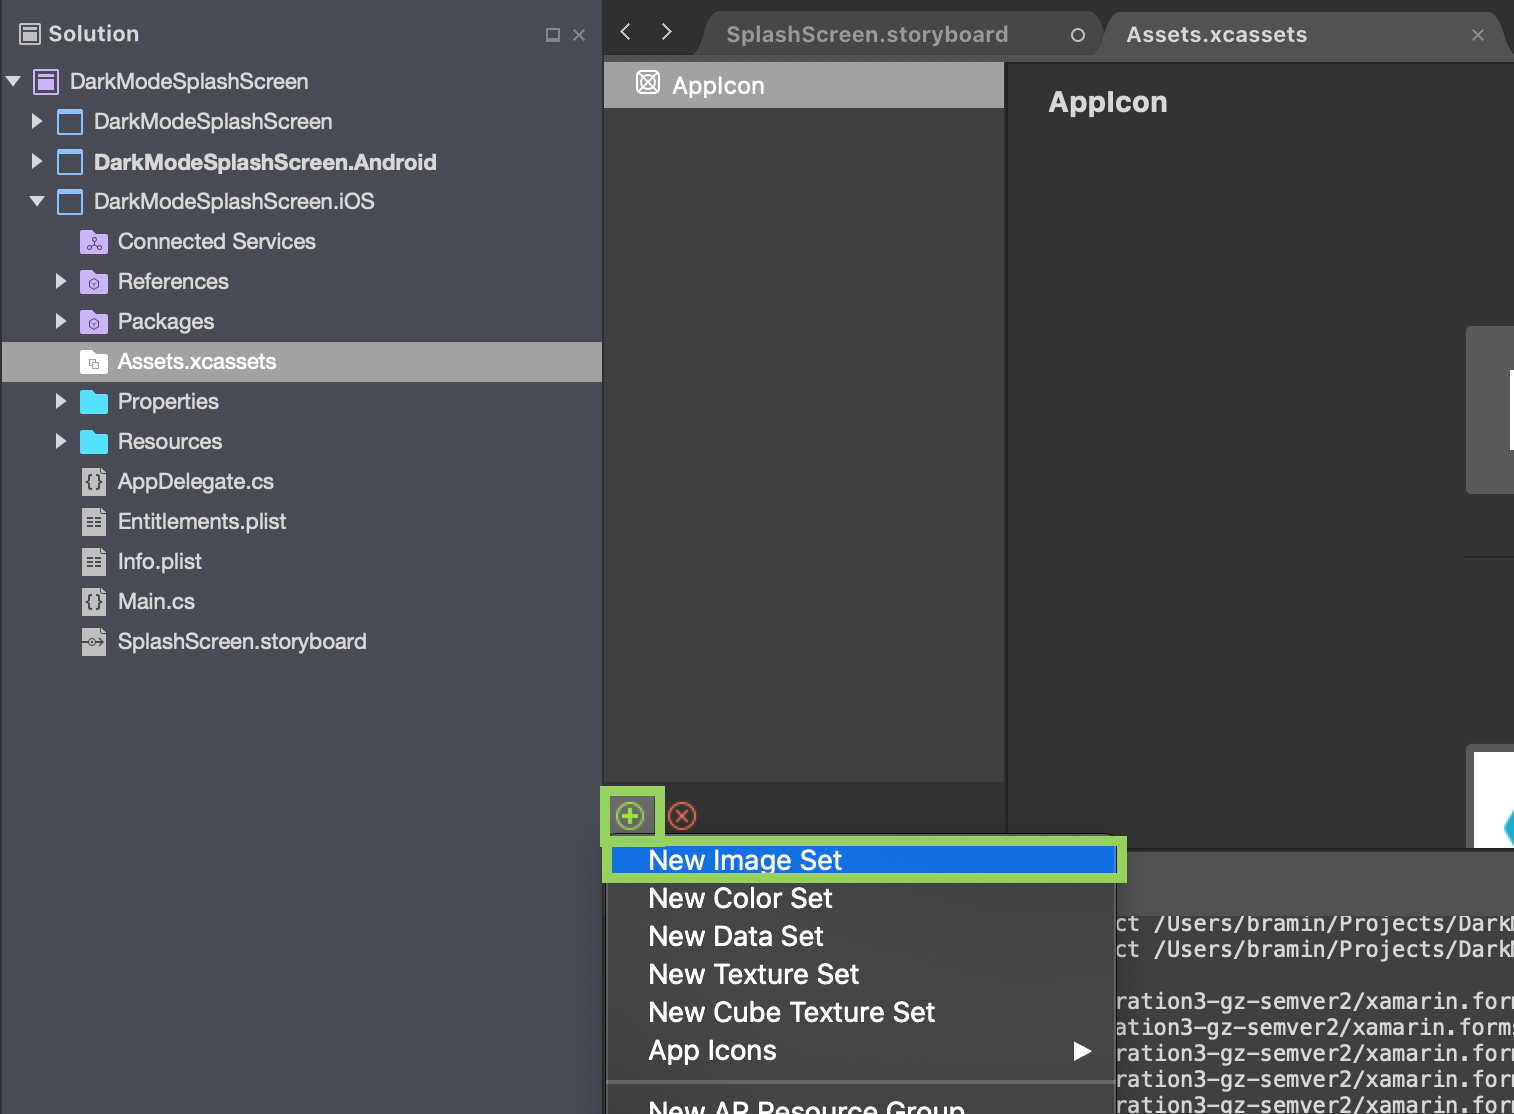
Add New Image Set
3\. In the **Assets.xcassets** window, rename the newly created Image Set from Image to **SplashScreenImage**
> Note: The name is case-sensitive
4\. In the **Assets.xcassets** window, double-click on the newly created Image Set, **SplashScreenImage**
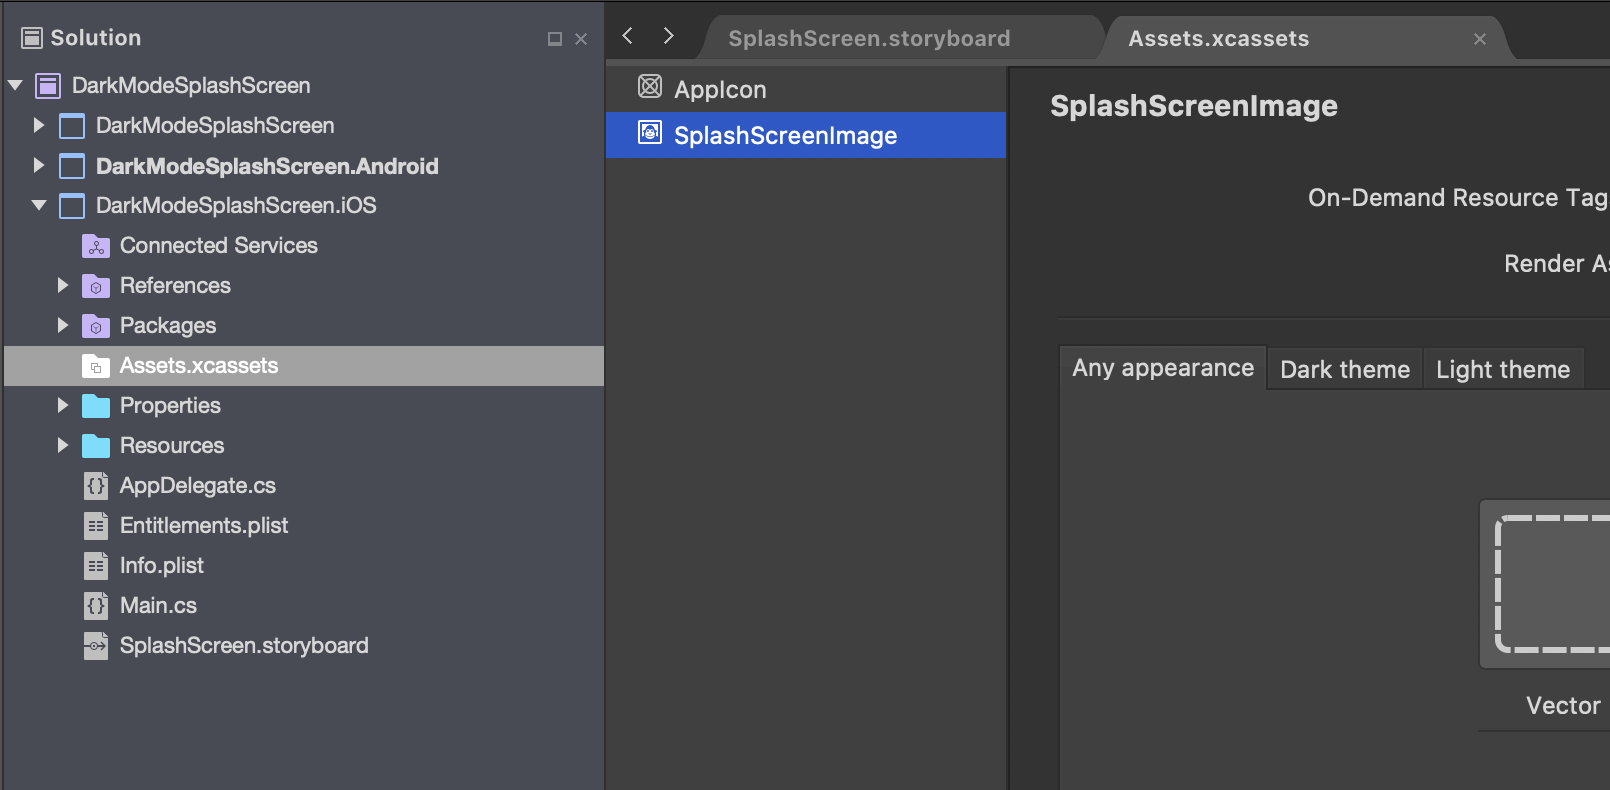
SplashScreenImage Image Set
5\. In the **SplashScreenImage** window, select **Dark theme**
6\. In the **Dark Theme** window, add an image for 2x and 3x
> Note: This is the image that will appear on our Splash Screen when the user has enabled Dark Theme. In Dark Theme, my splash screen will be displaying a white image on a black background.
> Note: If you are still supporting iOS 6 (or below), be sure to add a 1x image too; 1x images are obsolete if you are only targeting iOS7 and higher.
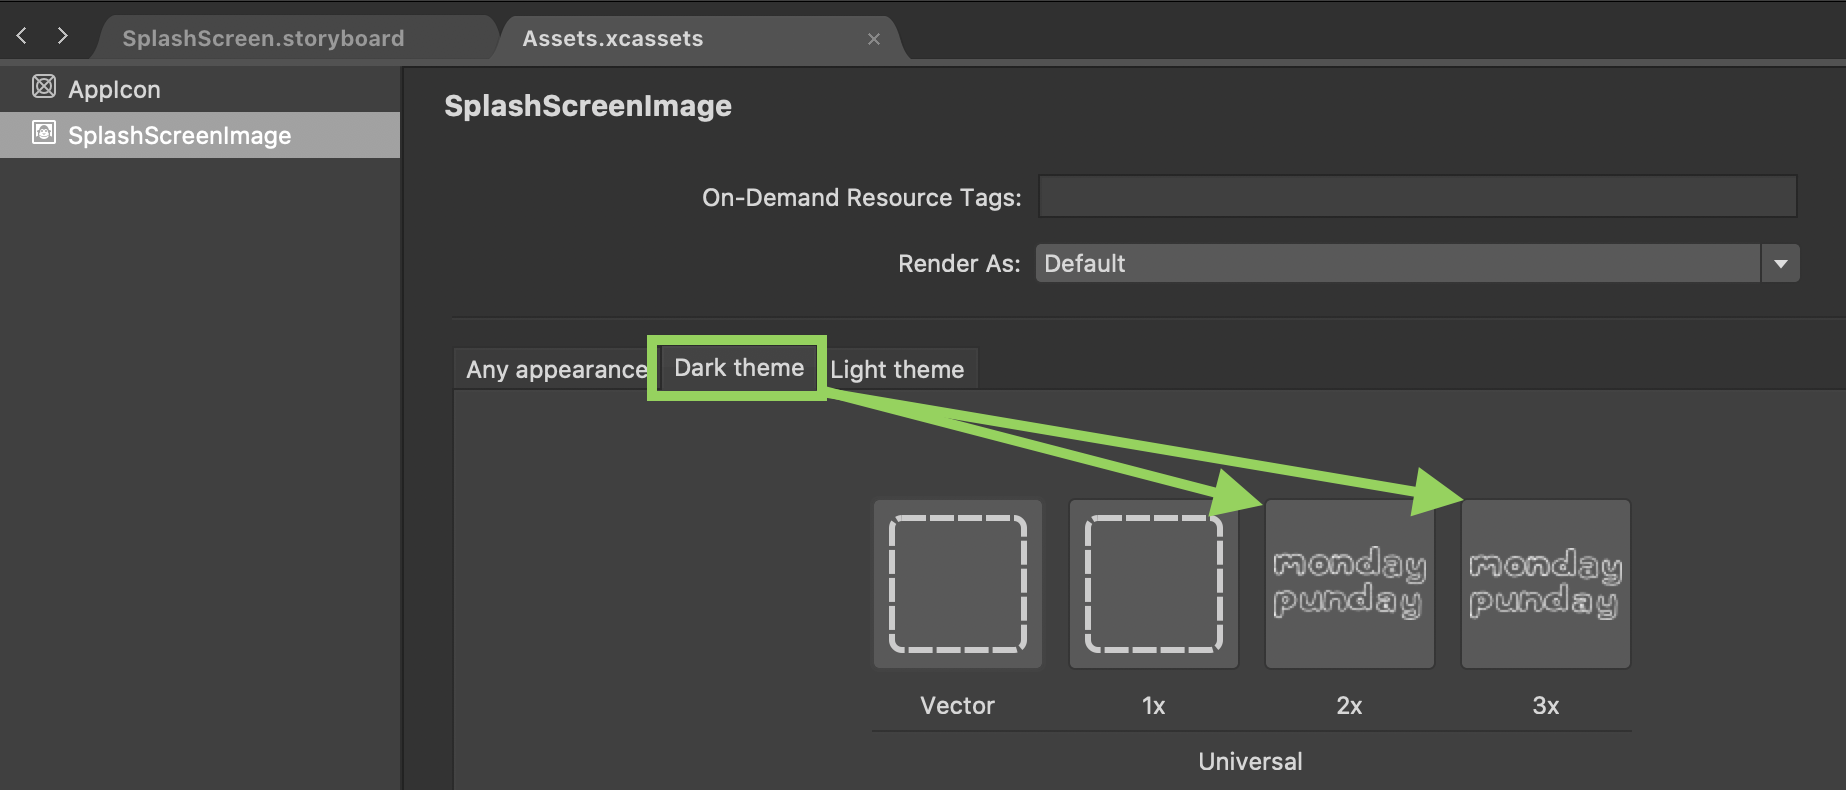
Dark Theme SplashScreenImage
7\. In the **SplashScreenImage** window, select **Light theme**
8\. In the **Light Theme** window, add an image for 2x and 3x
> Note: This is the image that will appear on our Splash Screen when the user has enabled Light Theme. In Light Theme, my splash screen will be displaying a black image on a white background.
> Note: If you are still supporting iOS 6 (or below), be sure to add a 1x image too; 1x images are obsolete if you are only targeting iOS7 and higher.
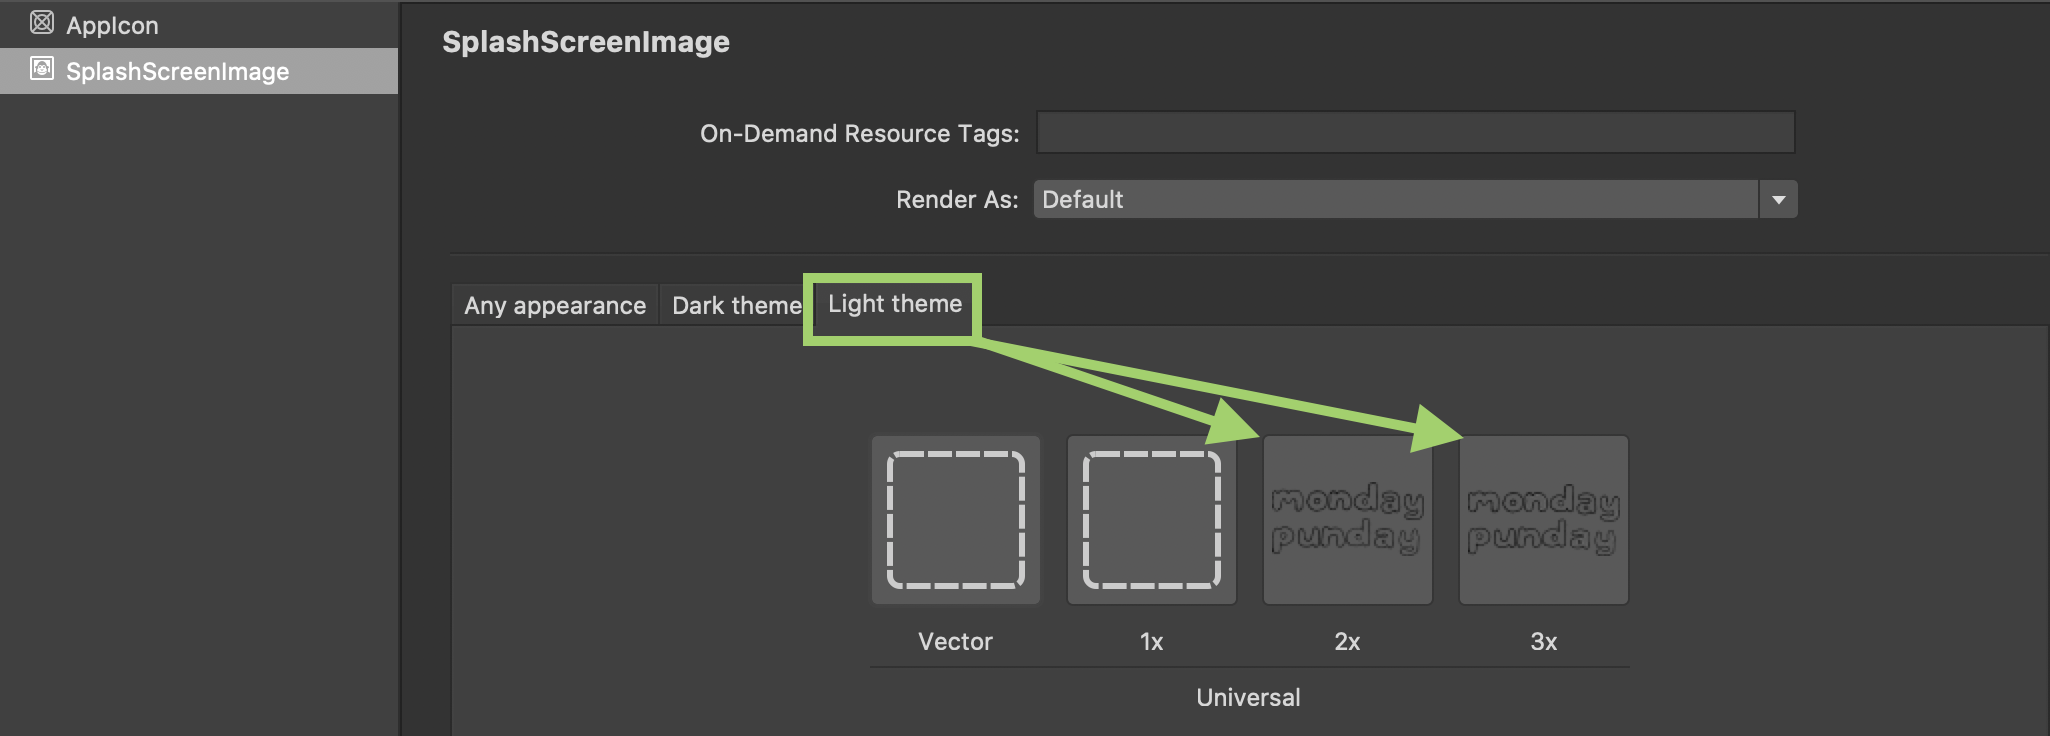
Light Theme SplashScreenImage
9\. In the **Visual Studio Solution Explorer**, in the Xamarin.iOS project, open **SplashScreen.storyboard**
10\. In the **SplashScreen.storyboard Editor**, click on the Image to select it
11\. In the **Properties** window, select **Widget**
12\. In the **Widget** pane, select **Image** \> **SplashScreenImage**
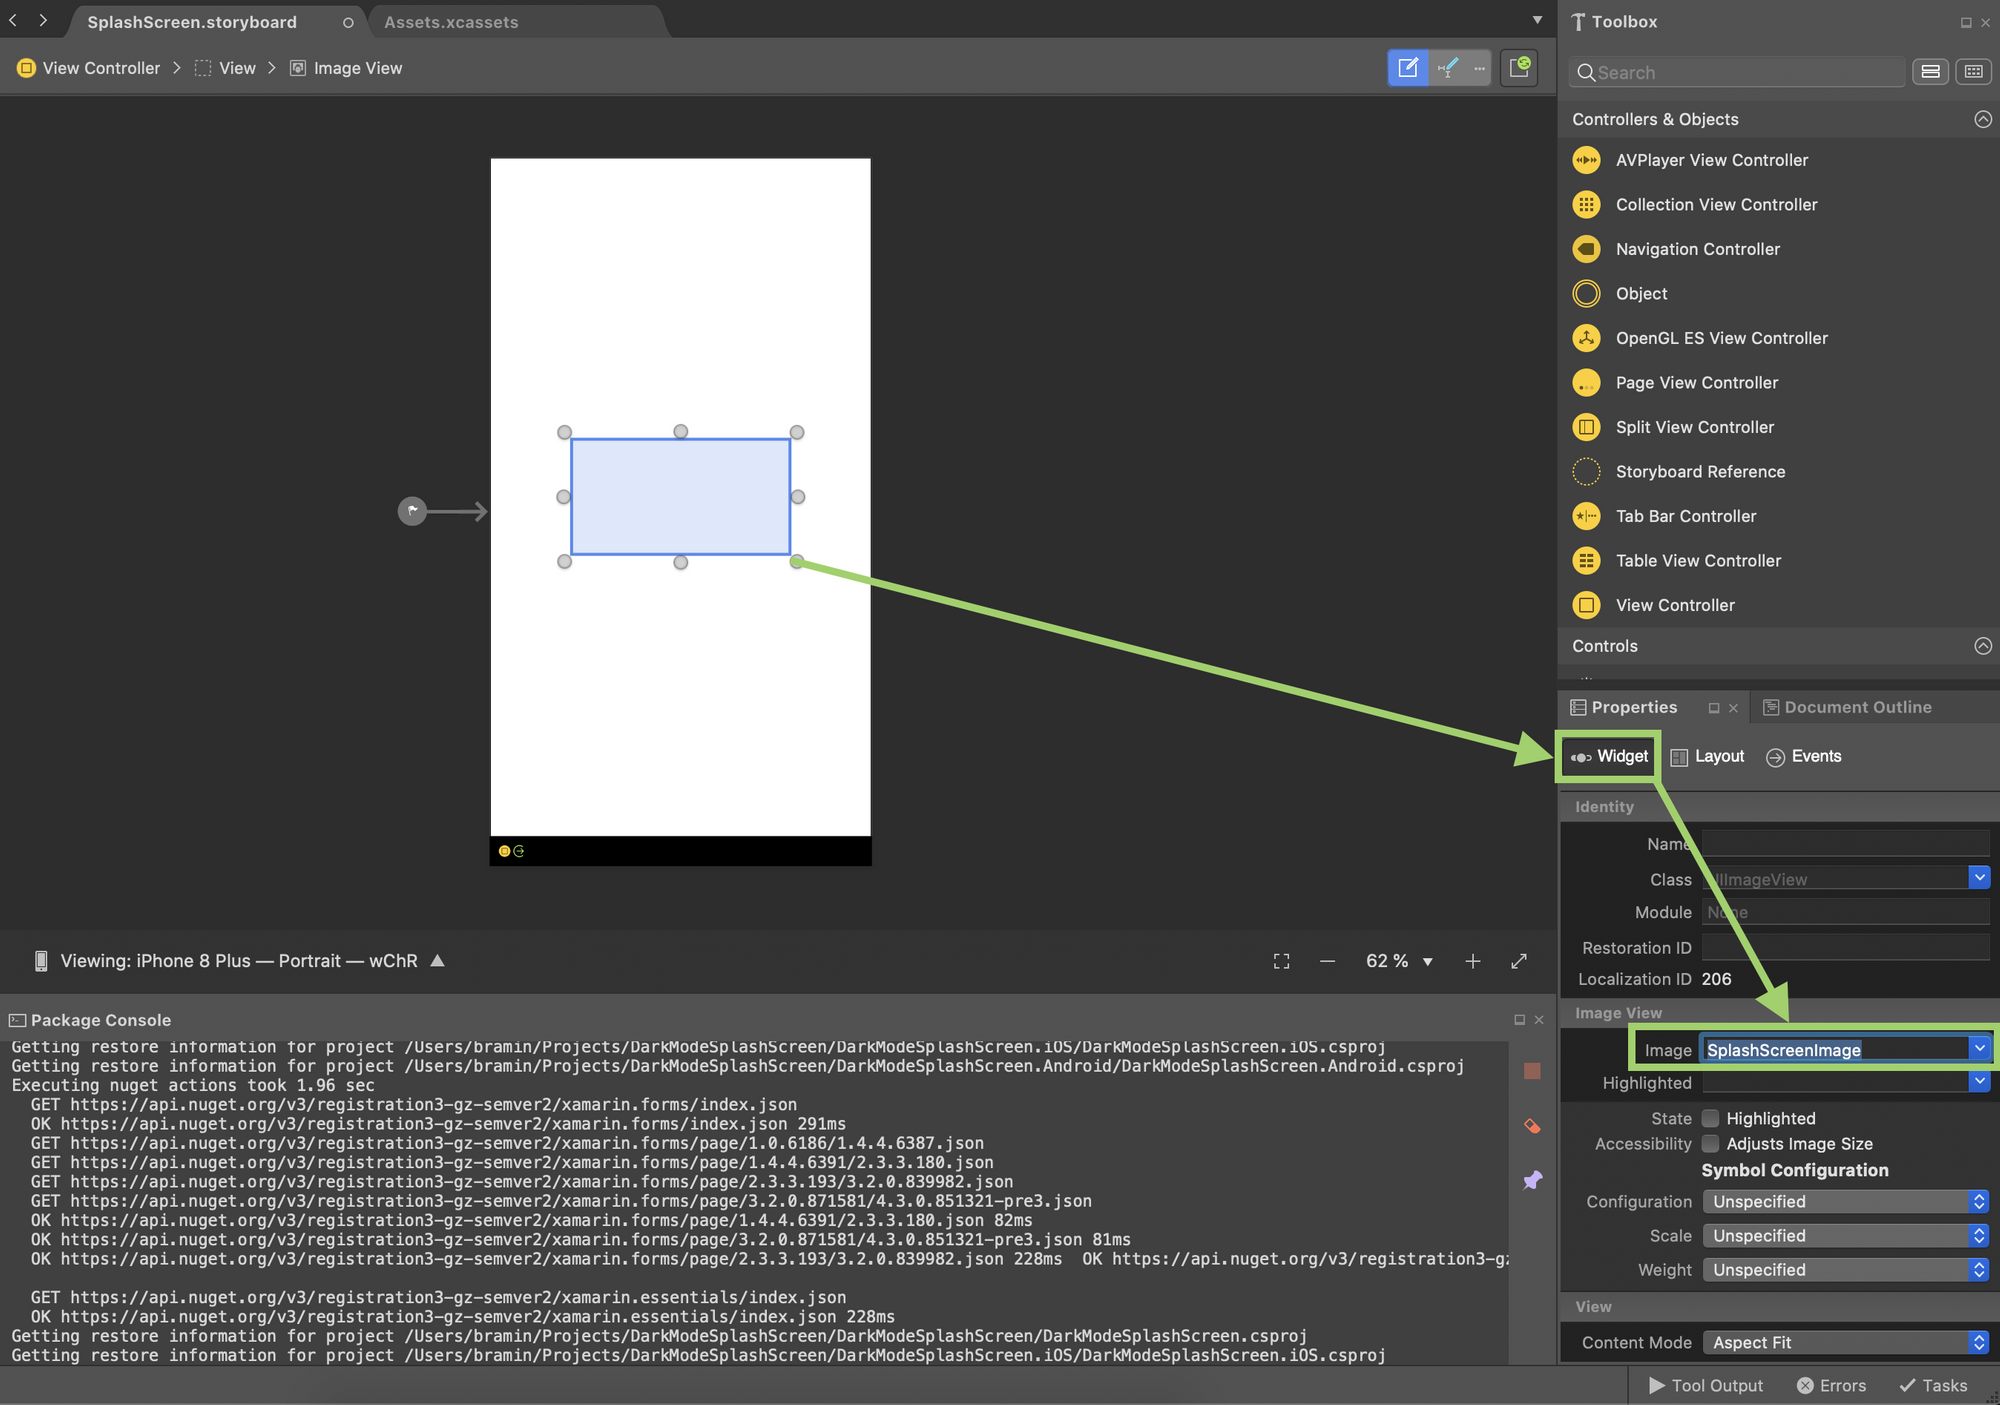
Image: SplashScreenImage
## 3\. Set LaunchScreen in Info.plist
Now that **SplashScreen.storyboard** is completed, let's configure our Info.plist to ensure our iOS app uses it as the Launch Screen.
1. In the **Visual Studio Solution Explorer**, in the Xamarin.iOS Project, open **Info.plist**
2. In the **Info.plist** editor, set the value of **Launch Screen** to use **SplashScreen**
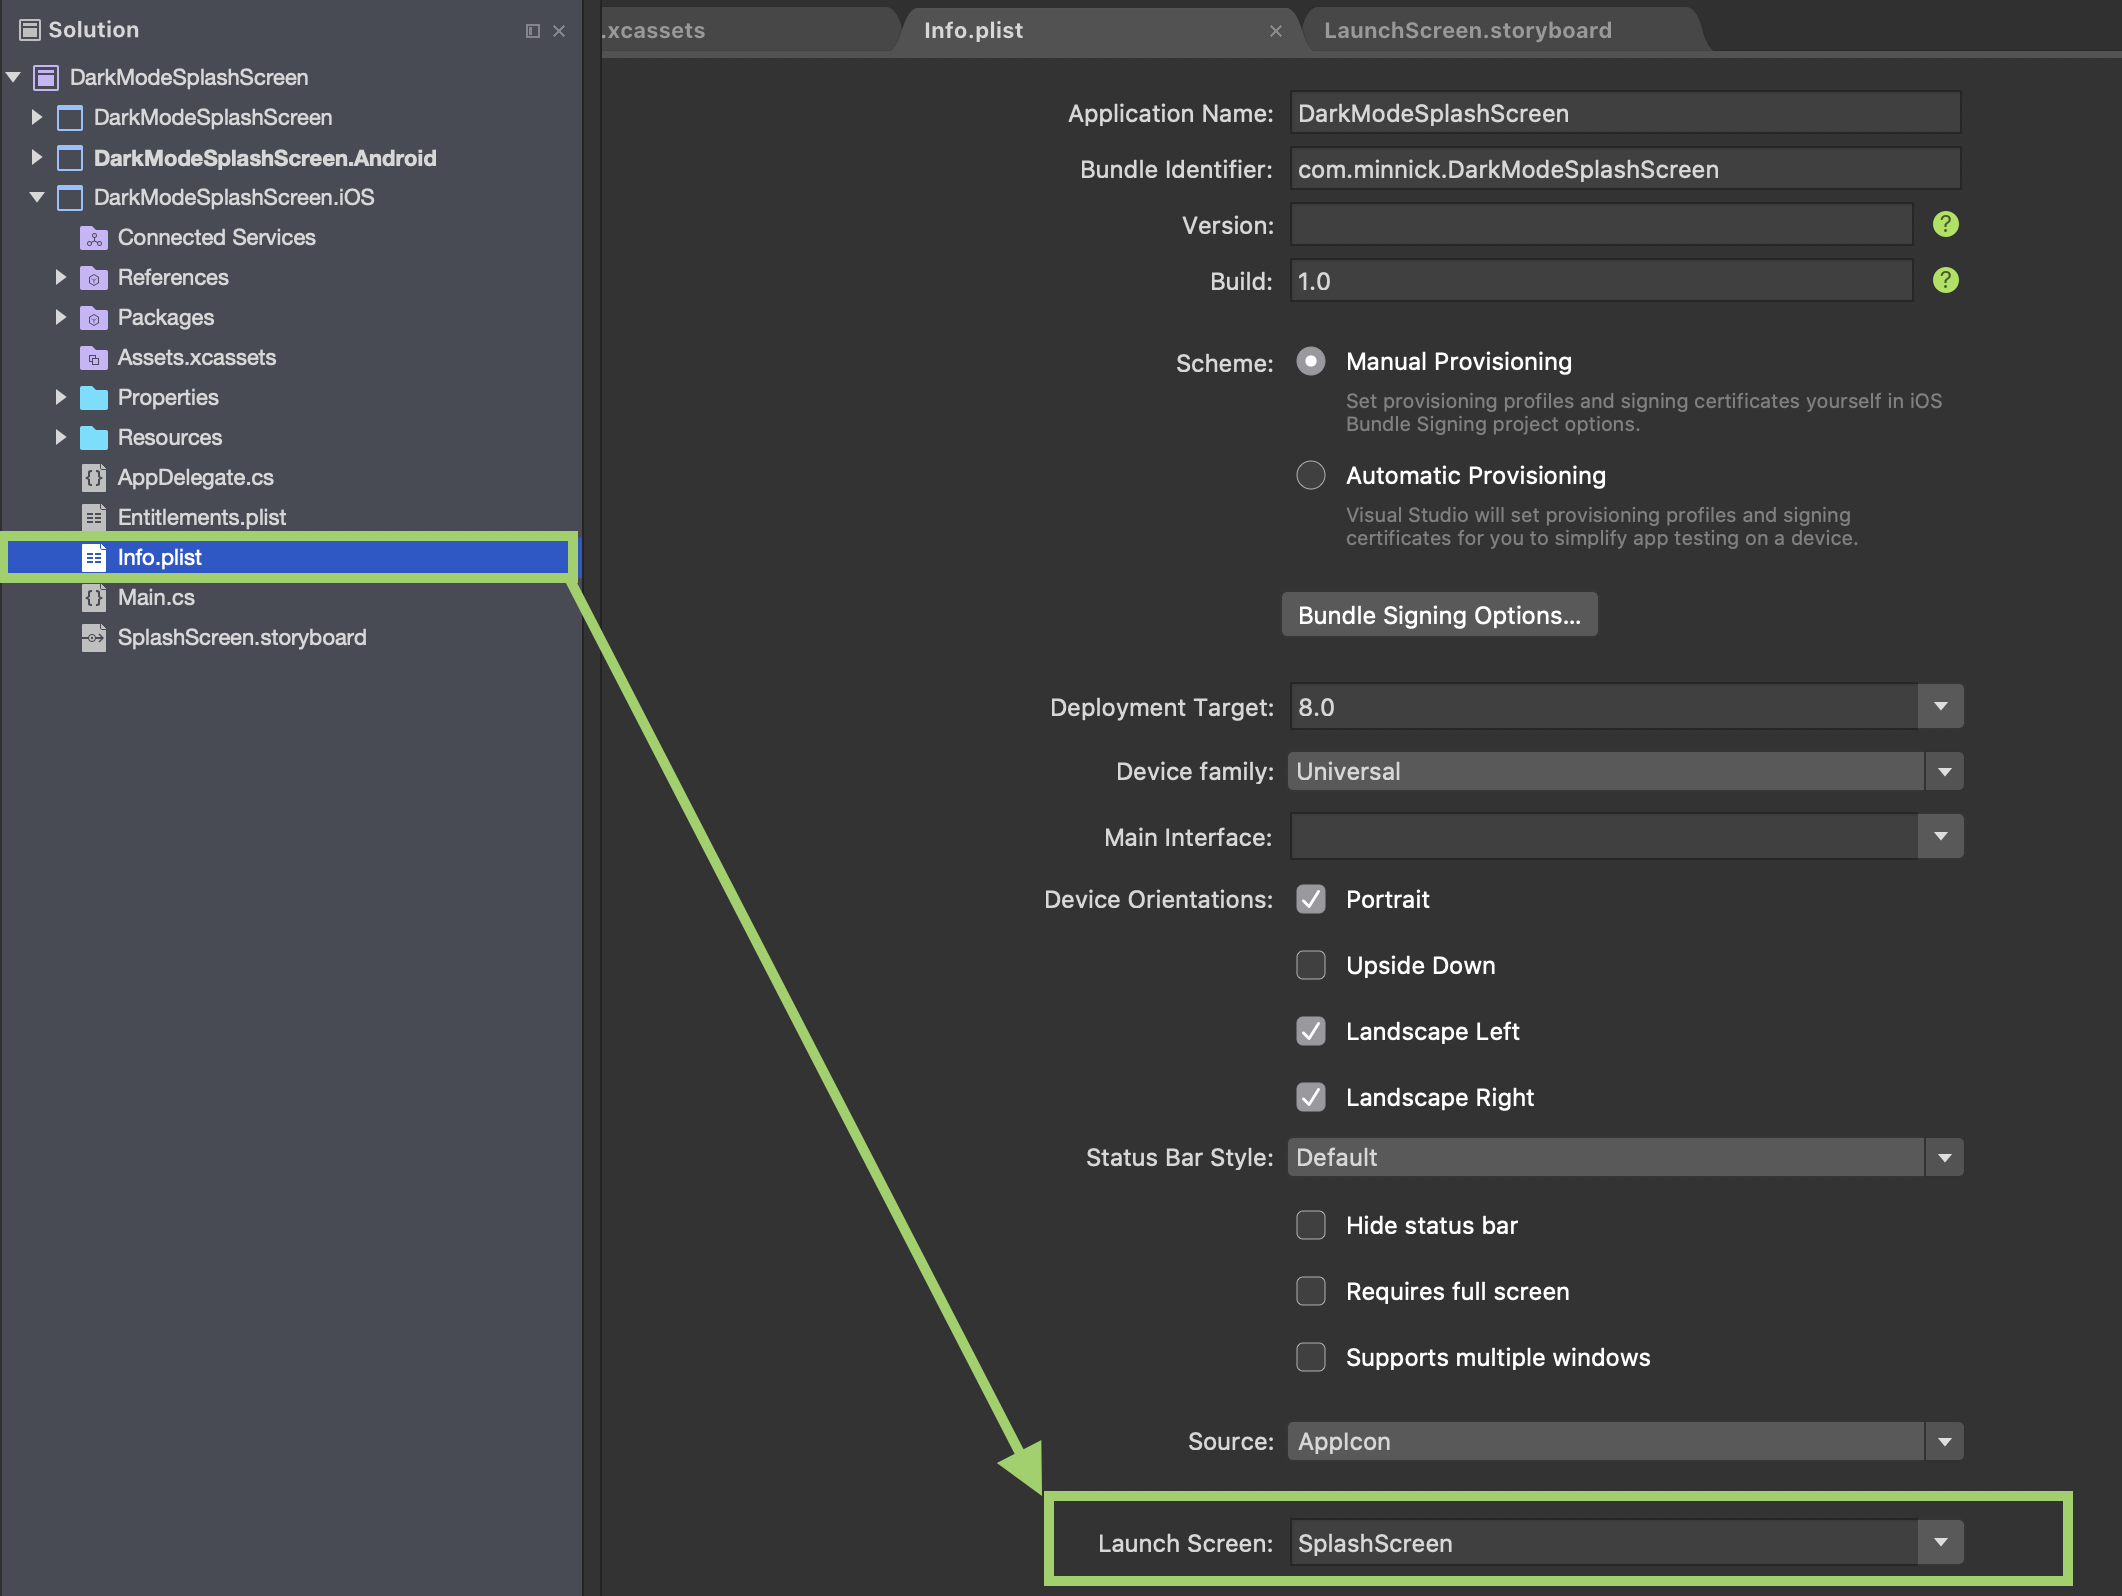
Info.plist Launch Screen
## Android Splash Screen
For Android, we'll leverage the **values-night** resource which will automatically detect whether the user has enabled Dark Mode and choose the correct splash screen to display.
To do this, we'll create the following items:
- Add Splash Screen Image (x2)
- Create Drawable XML (x2)
- Create Night Theme
| Dark Theme Enabled | Dark Theme Disabled |
| -------------------------------------------------------------------------------------------------------------------------------------------------- | --------------------------------------------------------------------------------------------------------------------------------------------------- |
|  |  |
### 1\. Add Splash Screen Images
Let's add two images to our **drawable** folder, one for light theme and one for dark theme.
1\. In the **Visual Studio Solution Explorer**, in the Xamarin.Android project, right-click **Resources** \> **drawable**
2\. In the right-click menu, select **Add** \> **New File**
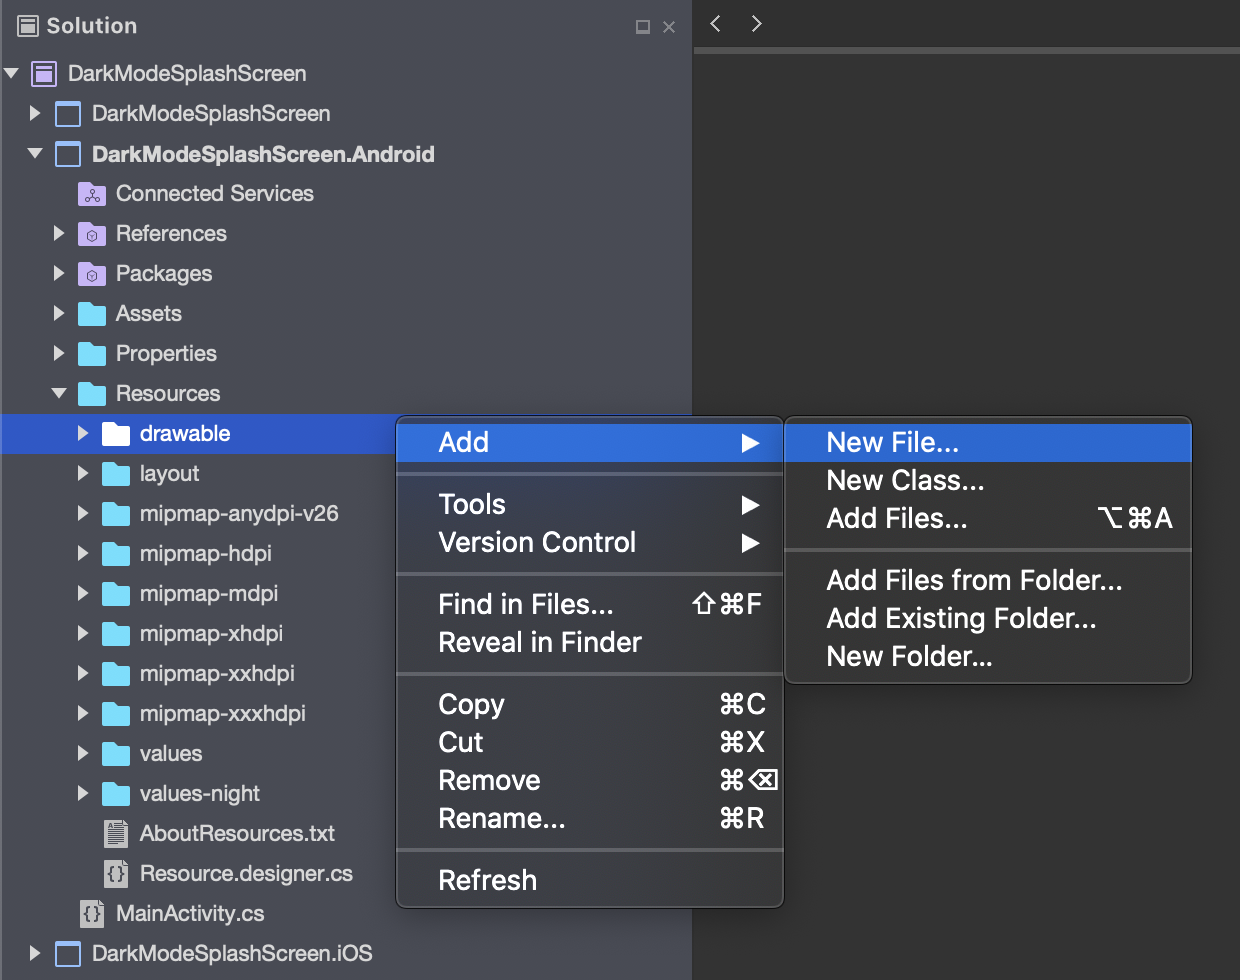
Add New File, Dark Theme Image
3\. In the **Add New Files** window, select the image to use for our Light Theme Splash Screen
> Note: In this example, I am using **MondayPundayBlack.png** to display a black image on a white background
4\. In the **Visual Studio Solution Explorer**, in the Xamarin.Android project, right-click **Resources** \> **drawable**
5\. In the right-click menu, select **Add** \> **New File**
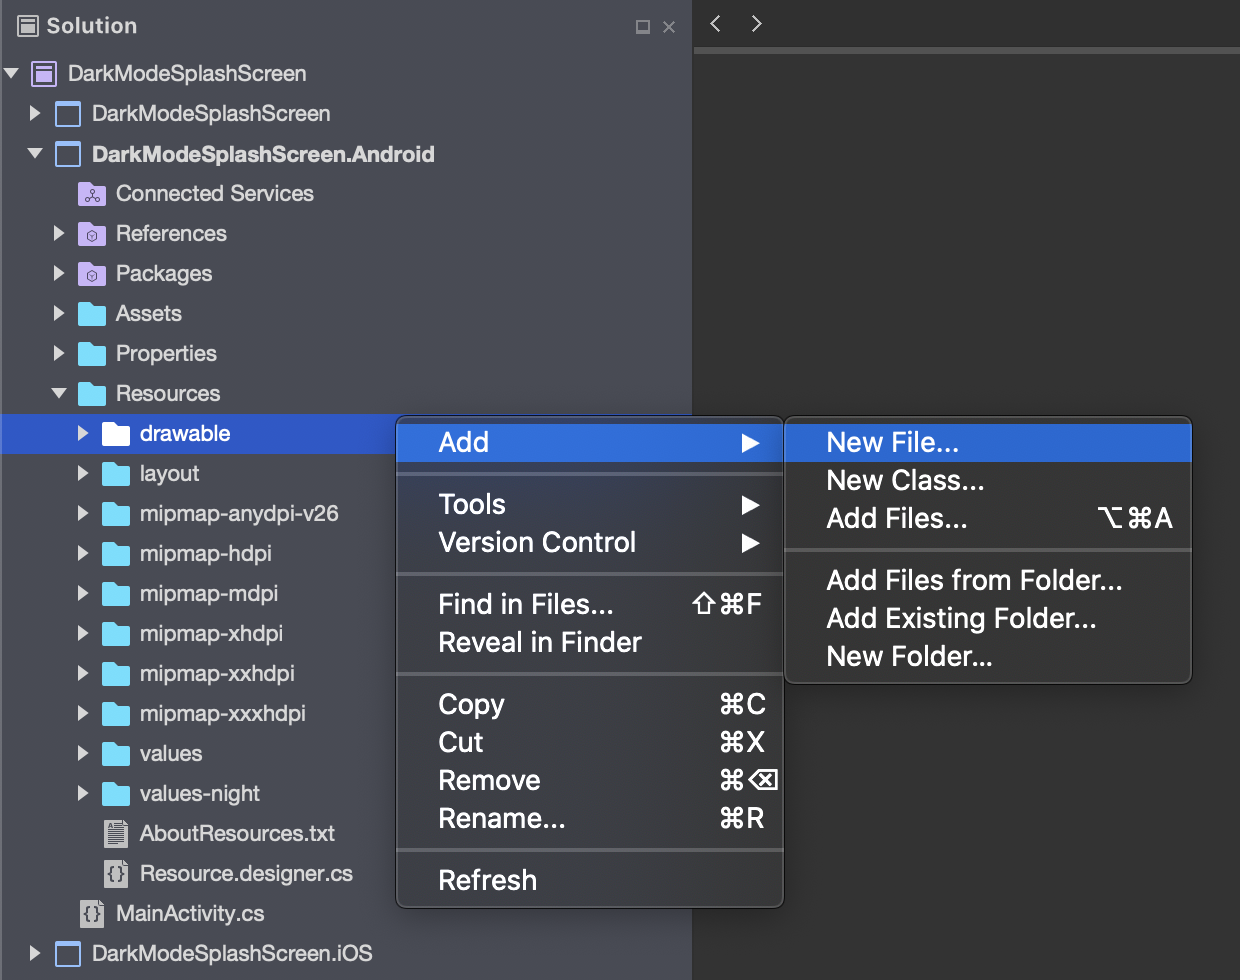
Add New File, Dark Theme Image
6\. In the **Add New Files** window, select the image to use for our Dark Theme Splash Screen
> Note: In this example, I am using **MondayPundayWhite.png** to display white image on a black background
## 2\. Create Splash Screen XML
In the **drawable** folder, we'll create two XML files for our splash screen; one for light theme and one for dark theme.
1\. In the **Visual Studio Solution Explorer**, in the Xamarin.Android project, right-click **Resources** \> **drawable**
2\. In the right-click menu, select **Add** \> **New File**
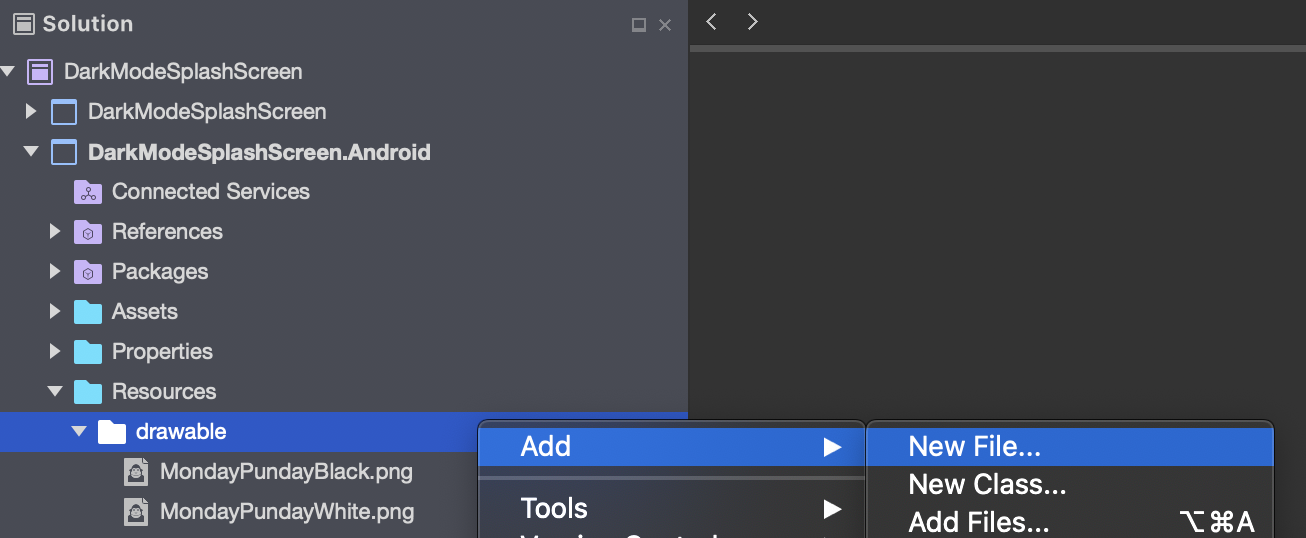
Create splash\_screen.xml
3\. In the **New File** window, create a new **XML** called **splash\_screen.xml**
> Note: The file name is case-sensitive; ensure it is all lower-case
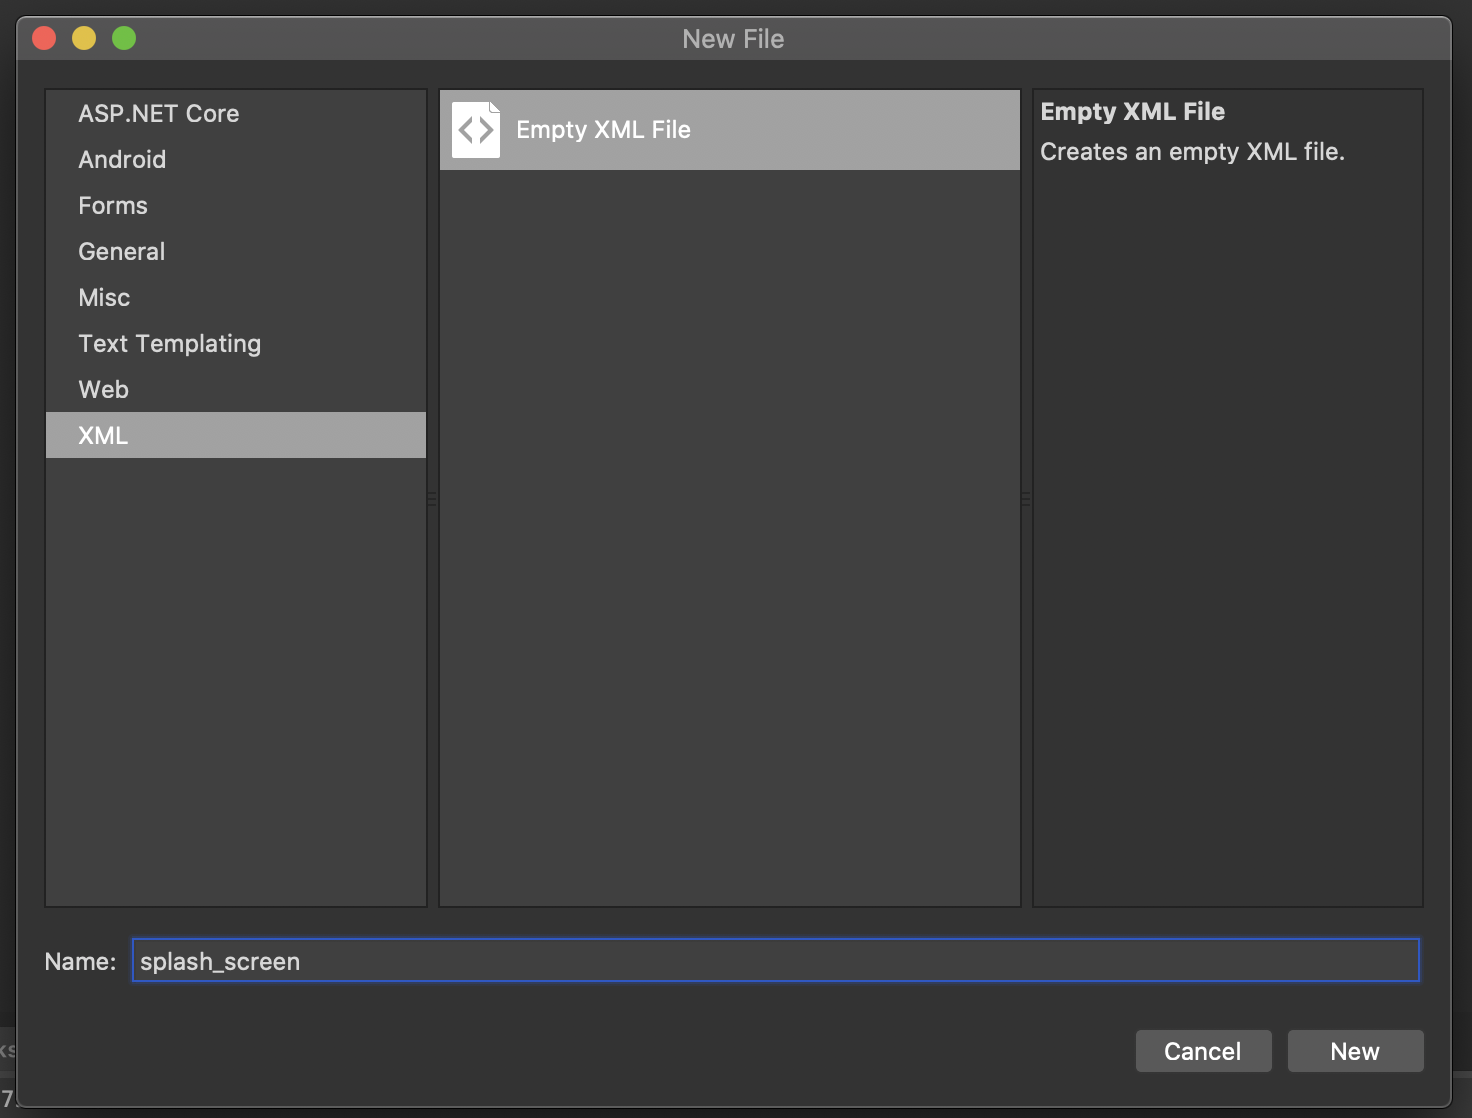
4\. In the **Visual Studio Solution Explorer**, in the Xamarin.Android project, open **Resources** \> **drawable** \> **splash\_screen.xml**
5\. In the **splash\_screen.xml** editor, enter the following code
```xml
-
```
> Note: In this is example, I am using `android:src="@drawable/MondayPundayBlack` and `android:drawable="@android:color/white` to display a black image on a white background
6\. In the **Visual Studio Solution Explorer**, in the Xamarin.Android project, right-click **Resources** \> **drawable**
7\. In the right-click menu, select **Add** \> **New File**

Create splash\_screen.xml
8\. In the **New File** window, create a new **XML** called **splash\_screen\_night.xml**
> Note: The file name is case-sensitive; ensure it is all lower-case
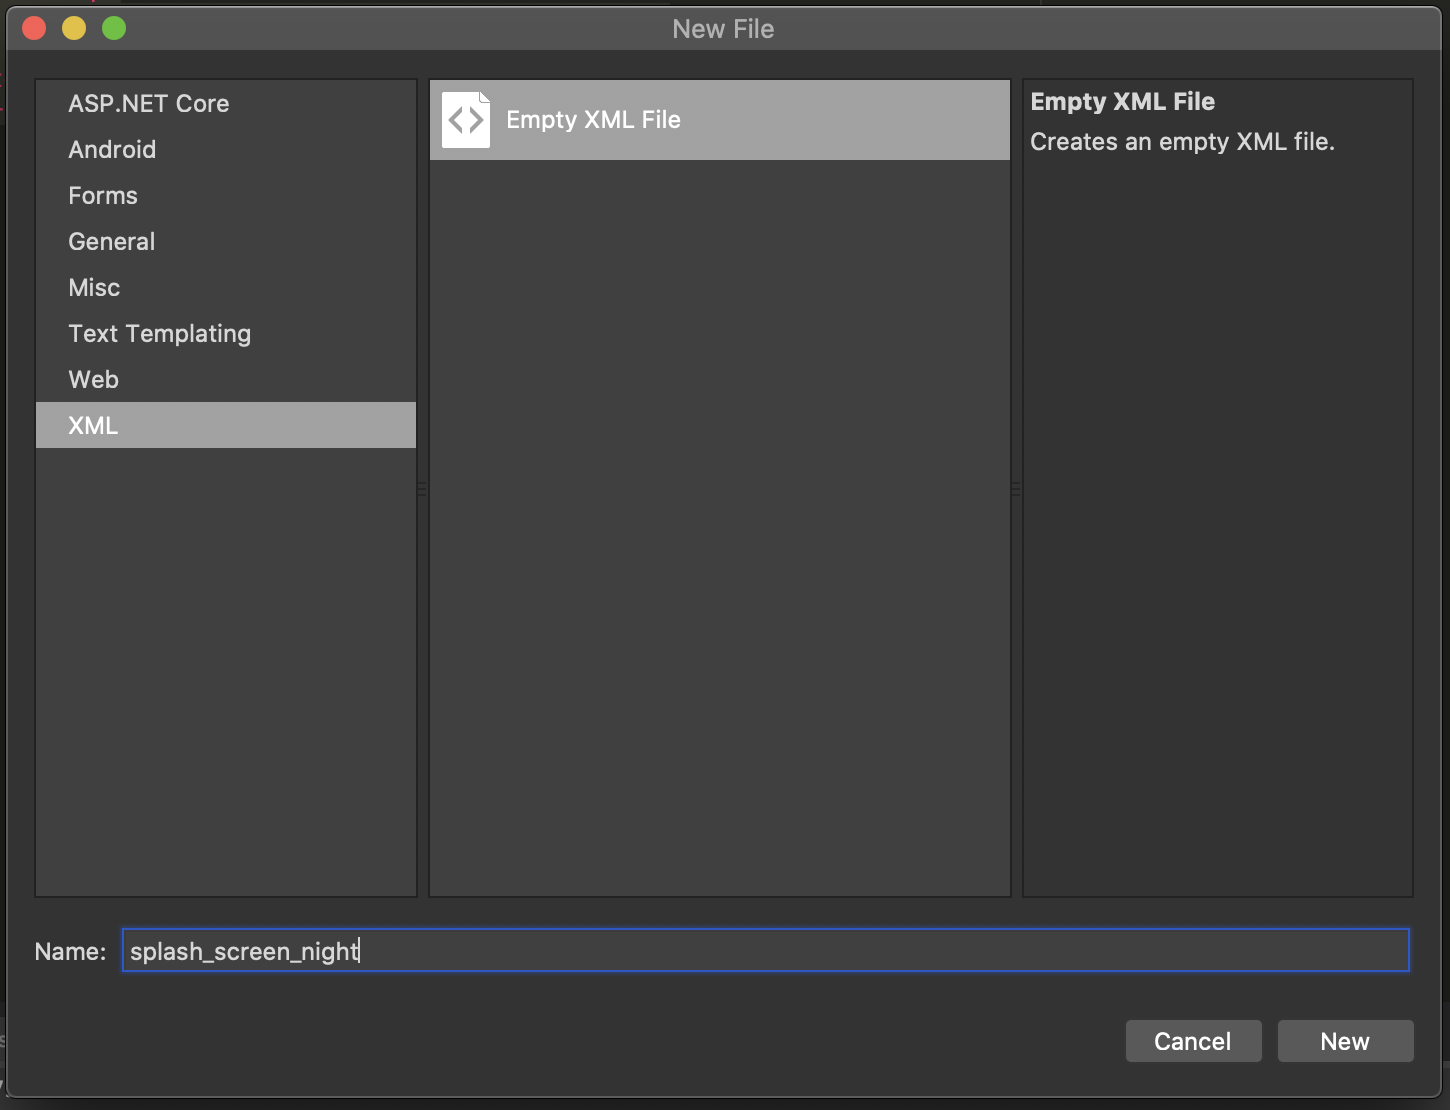
Create splash\_screen\_night.xml
9\. In the **Visual Studio Solution Explorer**, in the Xamarin.Android project, open **Resources** \> **drawable** \> **splash\_screen\_night.xml**
10\. In the **splash\_screen\_night.xml** editor, enter the following code
```xml
-
```
> Note: In this is example, I am using `android:src="@drawable/MondayPundayWhite` and `android:drawable="@android:color/black` to display a white image on a black background
### 3\. Add Night Theme
Android lets us implement multiple themes which the OS will automatically select for us at runtime based on whether or not the user has enabled Dark Mode in the Android System Settings.
In this sample, we'll create a folder called **values-night** to implement our Dark Theme splash screen, and we'll add to an existing folder called **values** to implement our Light Theme splash screen.
1. In the **Visual Studio Solution Explorer**, in the Xamarin.Android project, right-click on **Resources**
2. In the right-click menu, select **Add** \> **New Folder**
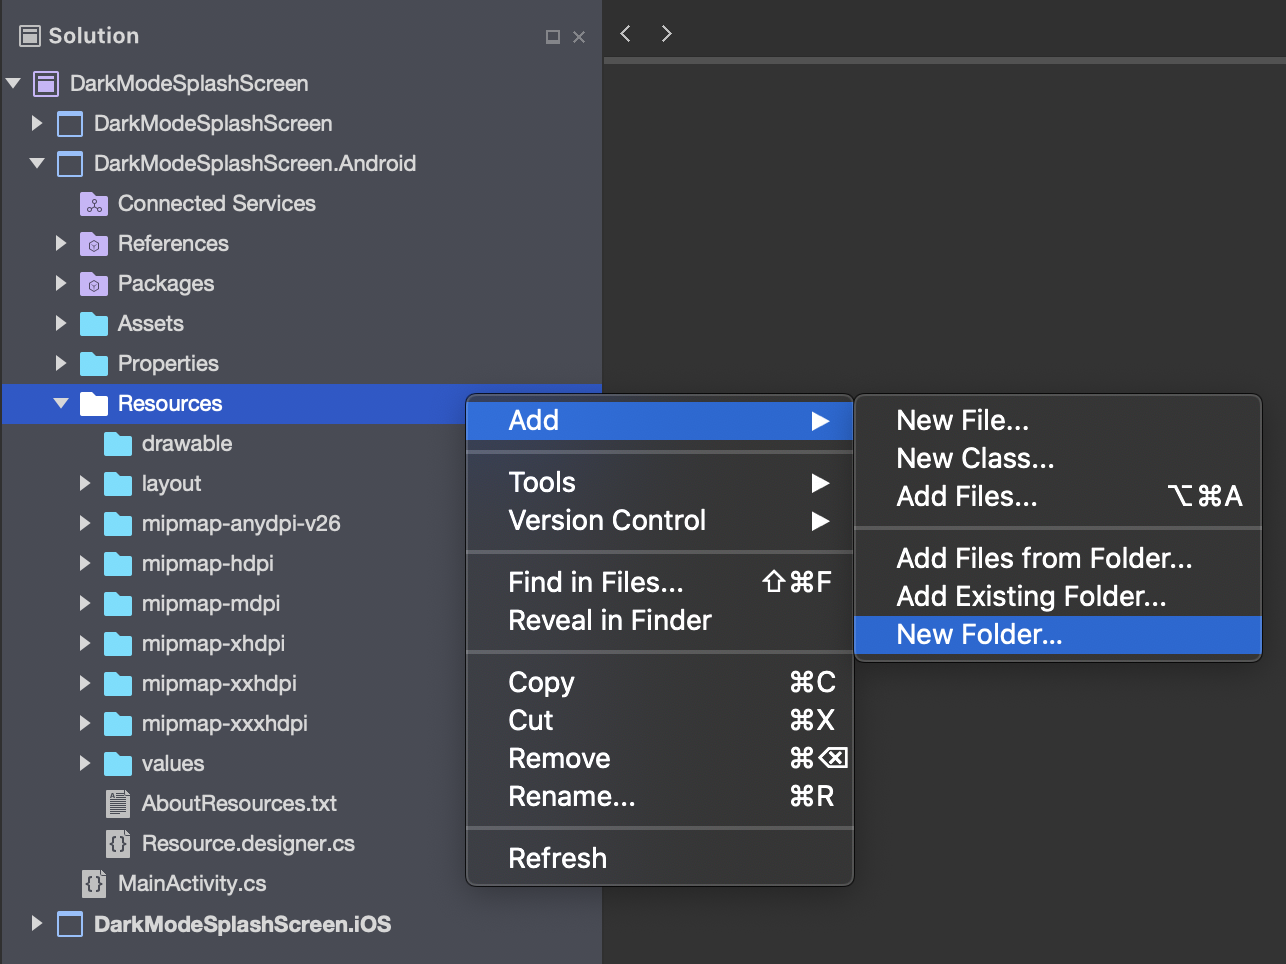
Add New Resources Folder
3\. Name the new folder **values-night**
> Note: The folder name is case-sensitive; ensure it is all lower-case
4\. In the **Visual Studio Solution Explorer**, right-click on the newly created folder, **values-night**
5\. In the right-click menu, select **Add New File**
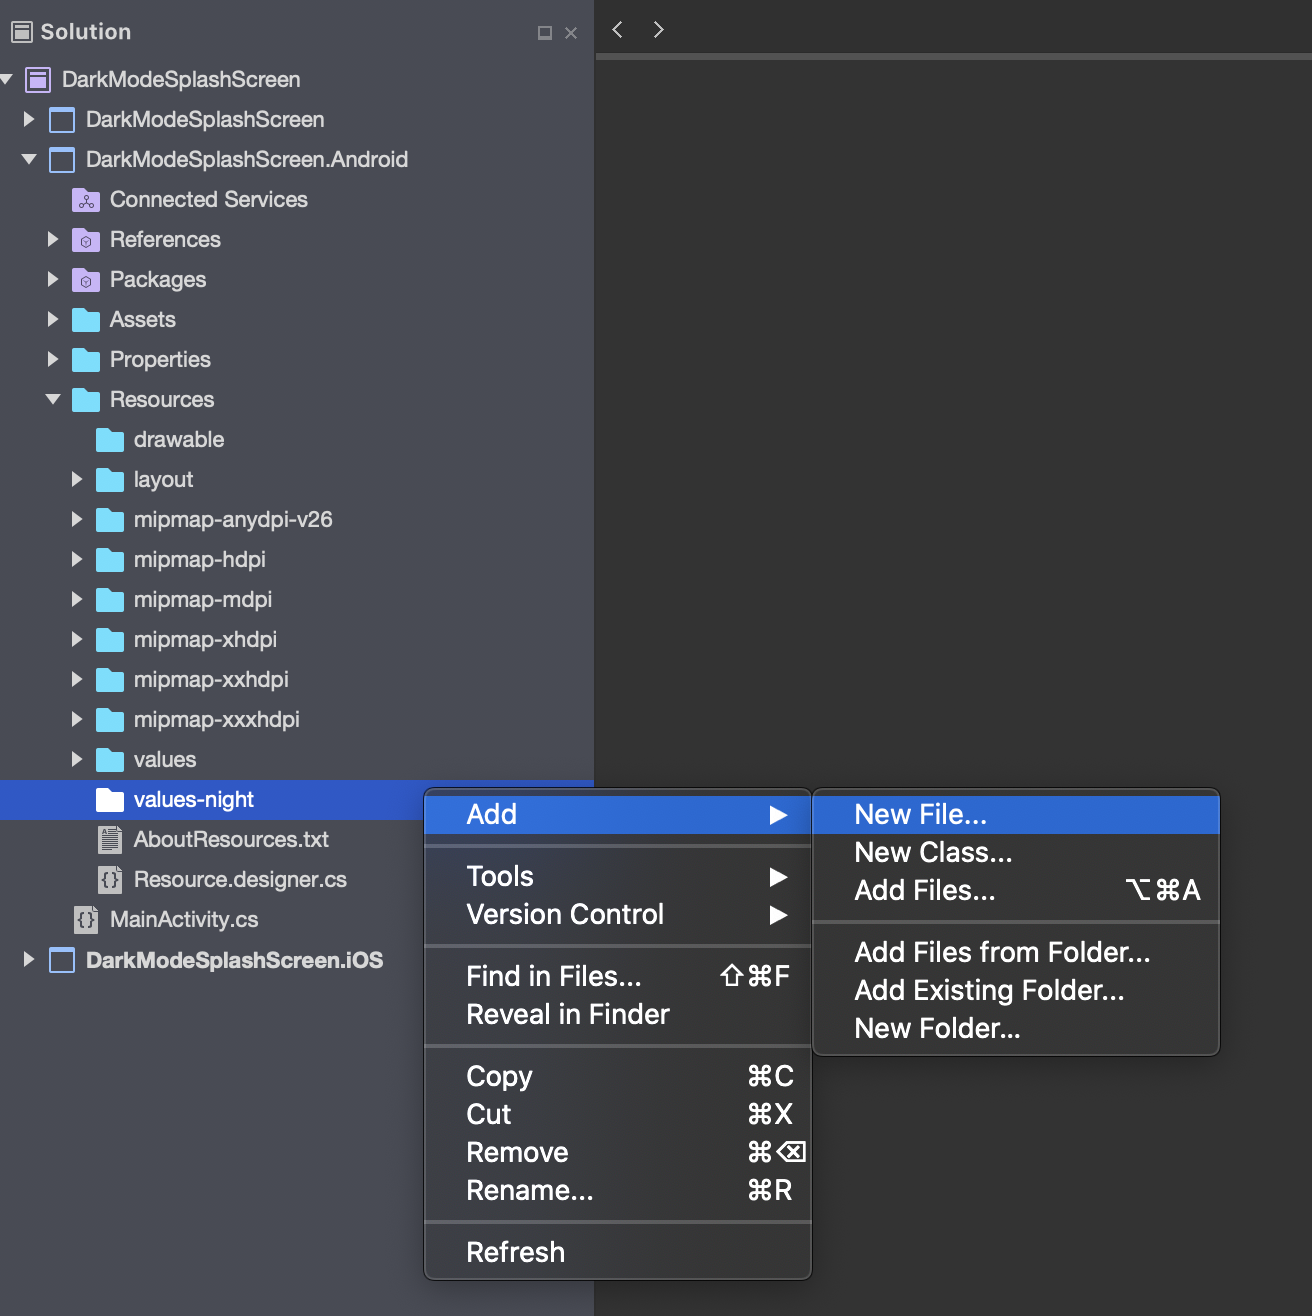
Add New File to values-night
6\. In the **New File** window, create a new **Empty XML** **File** named **styles.xml**
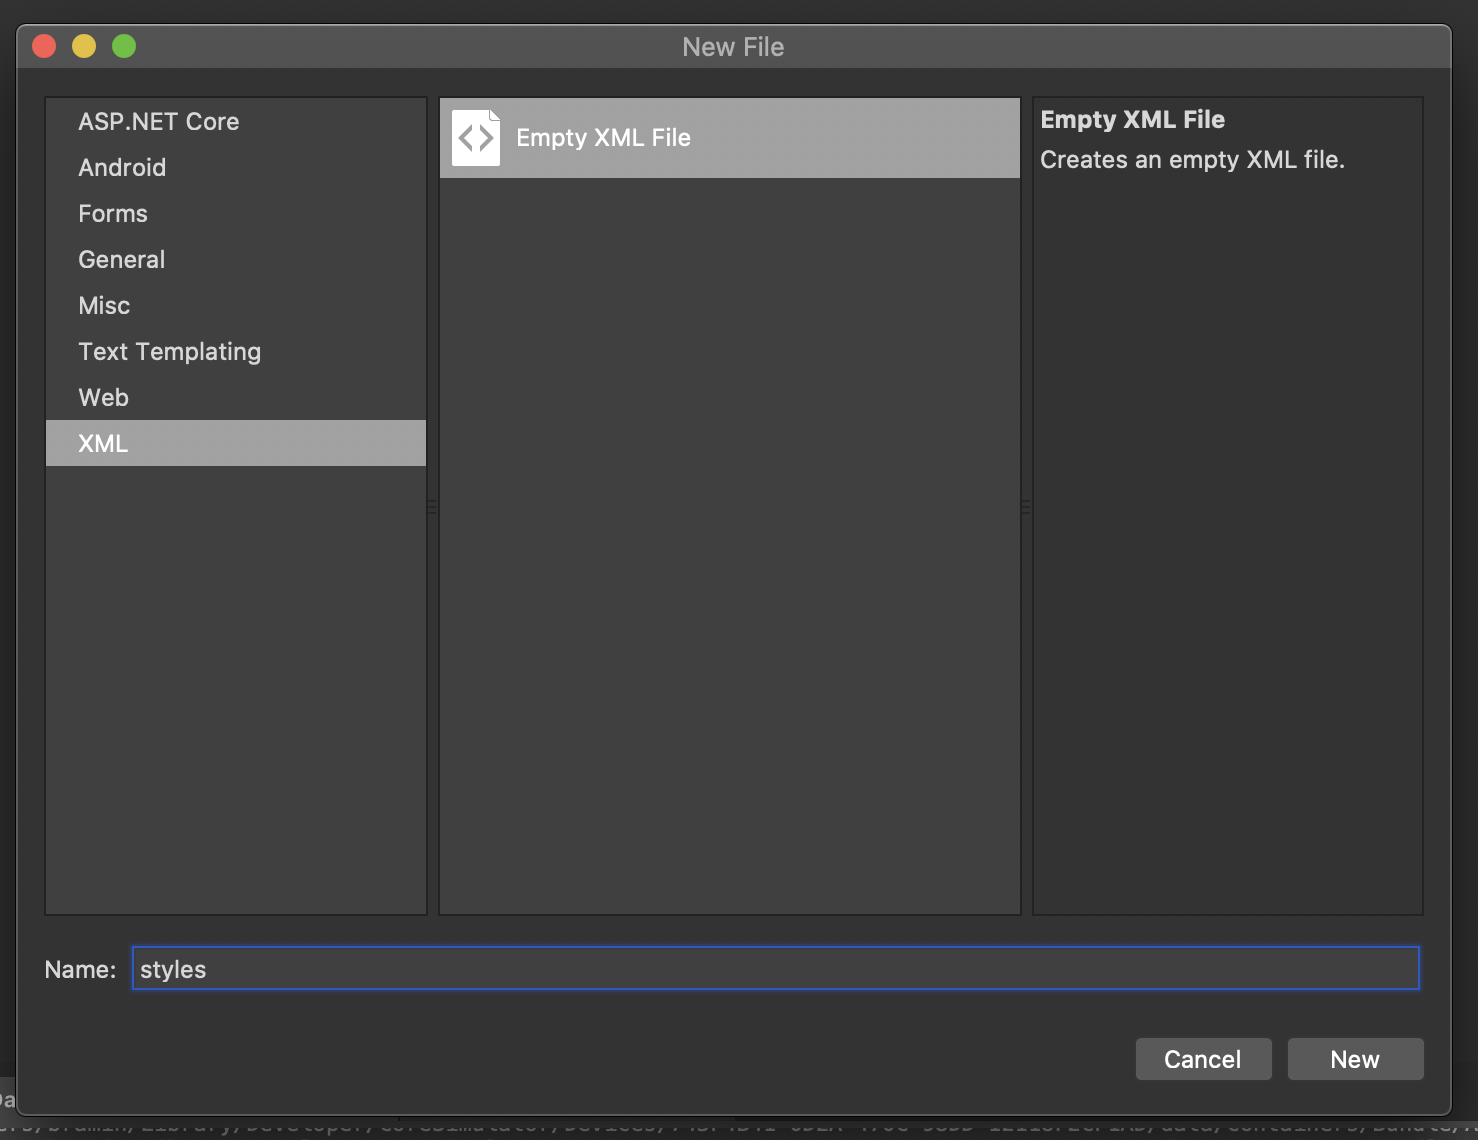
7\. In the **Visual Studio Solution Explorer**, in the Xamarin.Android project, open the newly created file **Resources > values-night** \> **styles.xml**
8\. In the **styles.xml** editor, enter the following code:
```xml
```
9\. In the **Visual Studio Solution Explorer**, in the Xamarin.Android project, open the file **Resources > values** \> **styles.xml**
10\. In the **styles.xml** editor, add the following `style`:
```xml
```
> Note: `MainTheme` is the default theme used in Xamarin.Forms templates, however, your app's theme may have a different name. Ensure `parent=[Your Theme]` uses the main theme of your app.
11\. For reference, here is my complete **styles.xml** file after adding our new `style`:
```xml
```
### 4\. Implement Splash Screen in MainActivity.cs
Now we need to update **MainActivity** to ensure it uses our newly created `LaunchTheme` as the Splash Screen.
1\. In the **Visual Studio Solution Explorer**, in the Xamarin.Android project, open **MainActivity.cs**
2\. In the **MainActivity.cs** editor, update the **Activity** attribute to use the following values:
- `Theme = "@style/LaunchTheme"`
- `LaunchMode = LaunchMode.SingleTop`
Here is an example of my complete **Activity** attribute:
```csharp
[Activity(Label = "DarkModeSplashScreen", Icon = "@mipmap/icon", Theme = "@style/LaunchTheme", LaunchMode = LaunchMode.SingleTop, MainLauncher = true, ConfigurationChanges = ConfigChanges.ScreenSize | ConfigChanges.Orientation)]
```
3\. In the **MainActivity.cs** editor, in the `OnCreate` method, before `base.OnCreate`, add the following line of code:
`base.SetTheme(Resource.Style.MainTheme);`
Here is an example of the updated `OnCreate` method:
```csharp
protected override void OnCreate(Bundle savedInstanceState)
{
//...
base.SetTheme(Resource.Style.MainTheme);
base.OnCreate(savedInstanceState);
//...
}
```
> Note: `MainTheme` is the default theme used in Xamarin.Forms templates, however, your app's theme may have a different name. You can find your app's theme name in **Resources** \> **values** \> **styles.xml**
## Conclusion
Now we have a splash screen that will automatically detect the OS's theme and display the appropriate splash screen.
The completed solution for this walkthrough can be found here: [https://github.com/brminnick/DarkModeSplashScreen](https://github.com/brminnick/DarkModeSplashScreen?ref=codetraveler.io)
To continue on your journey of implementing Dark Mode, I recommend my earlier blog post, [Check for Dark Mode in Xamarin.Forms](https://codetraveler.io/2019/10/11/creating-a-dark-mode-splash-screen/Check%20for%20Dark%20Mode%20in%20Xamarin.Forms).